
There’s something undeniably magical about the arrival of Easter—it’s a season that invites creativity and joy into our kitchens. This No-Bake Chocolate Easter Egg Slice captures that very spirit, bringing together a delightful blend of textures and flavors in a fun, festive treat. Unlike traditional baked goods, this recipe requires mere minutes of your time, making it the perfect way to whip up something wonderfully sweet without heating up the oven. Not only is it an instant crowd-pleaser, but you can customize it with your favorite treats, transforming each slice into a personalized dessert masterpiece. Whether you’re making it for a gathering or just to indulge your cravings, this easy-to-make dessert will add a touch of cheerful excitement to your celebrations. Ready to dive into a recipe that promises satisfaction with every bite? Let’s get started!

Why Is This Recipe a Must-Try?
Unmatched Simplicity: With no baking involved, it’s as easy as mixing and chilling.
Crowd-Pleaser: The vibrant colors and enticing textures are sure to impress guests of all ages.
Versatile Flavor: Customize with your favorite candies or opt for seasonal variations to keep it fresh year-round.
Quick & Easy: Whip it up in just a few minutes, perfect for last-minute gatherings!
Store and Enjoy: Keep leftovers in the fridge for a week, letting you savor this treat whenever cravings hit.
Pair this dessert with some delicious Easter Smoked Salmon for an impressive spread, or relish it alongside Strawberry Crunch Cheesecake to satisfy your sweet side. Enjoy the fun of creating this delightful No-Bake Chocolate Easter Egg Slice!
No-Bake Chocolate Easter Egg Slice Ingredients
For the Base
- Dark Chocolate – Provides a rich chocolate flavor; substitute with semi-sweet or milk chocolate for a sweeter bite.
- Condensed Milk – Essential for texture, acting as a binding agent; do not substitute.
- Butter – Adds richness and helps bind the base; coconut oil can be used for a dairy-free option.
- Milk Arrowroot Biscuits – Forms the base structure; can be substituted with plain biscuits like Superwines or Marie biscuits.
- Cornflakes or Rice Bubbles – Offer a satisfying crunch; cornflakes are recommended for better texture.
For the Topping
- White Chocolate – Creates a creamy top layer; dark chocolate can also be used if preferred.
- Mini Caramello Eggs/Creme Eggs – Adds festive flavor and creaminess; feel free to swap with any favorite Easter candies.
- Mini Eggs and Smarties – Provide color and additional flavor; mix in any candies you like.
- Sprinkles – Enhances visual appeal and sweetness; optional if you prefer a simpler look.
For the Chocolate Mixture
- Vegetable Oil – Helps smooth the melted chocolate; can be omitted but improves texture.
Step‑by‑Step Instructions for No-Bake Chocolate Easter Egg Slice
Step 1: Prepare the Tin
Start by lining a 19 x 29 cm slice tin with baking paper, ensuring it hangs over the edges for easy removal later. This will prevent sticking and make cleanup a breeze. Place the lined tin aside while you prepare the chocolate mixture, setting the stage for the delightful No-Bake Chocolate Easter Egg Slice.
Step 2: Melt the Chocolate Mixture
In a microwave-safe bowl, combine the dark chocolate, condensed milk, and butter. Microwave the mixture in 30-second bursts, stirring in between until it is completely melted and smooth, which should take about 1.5 to 2 minutes in total. The glossy texture indicates it’s ready, providing a rich foundation for your slice.
Step 3: Combine the Base Ingredients
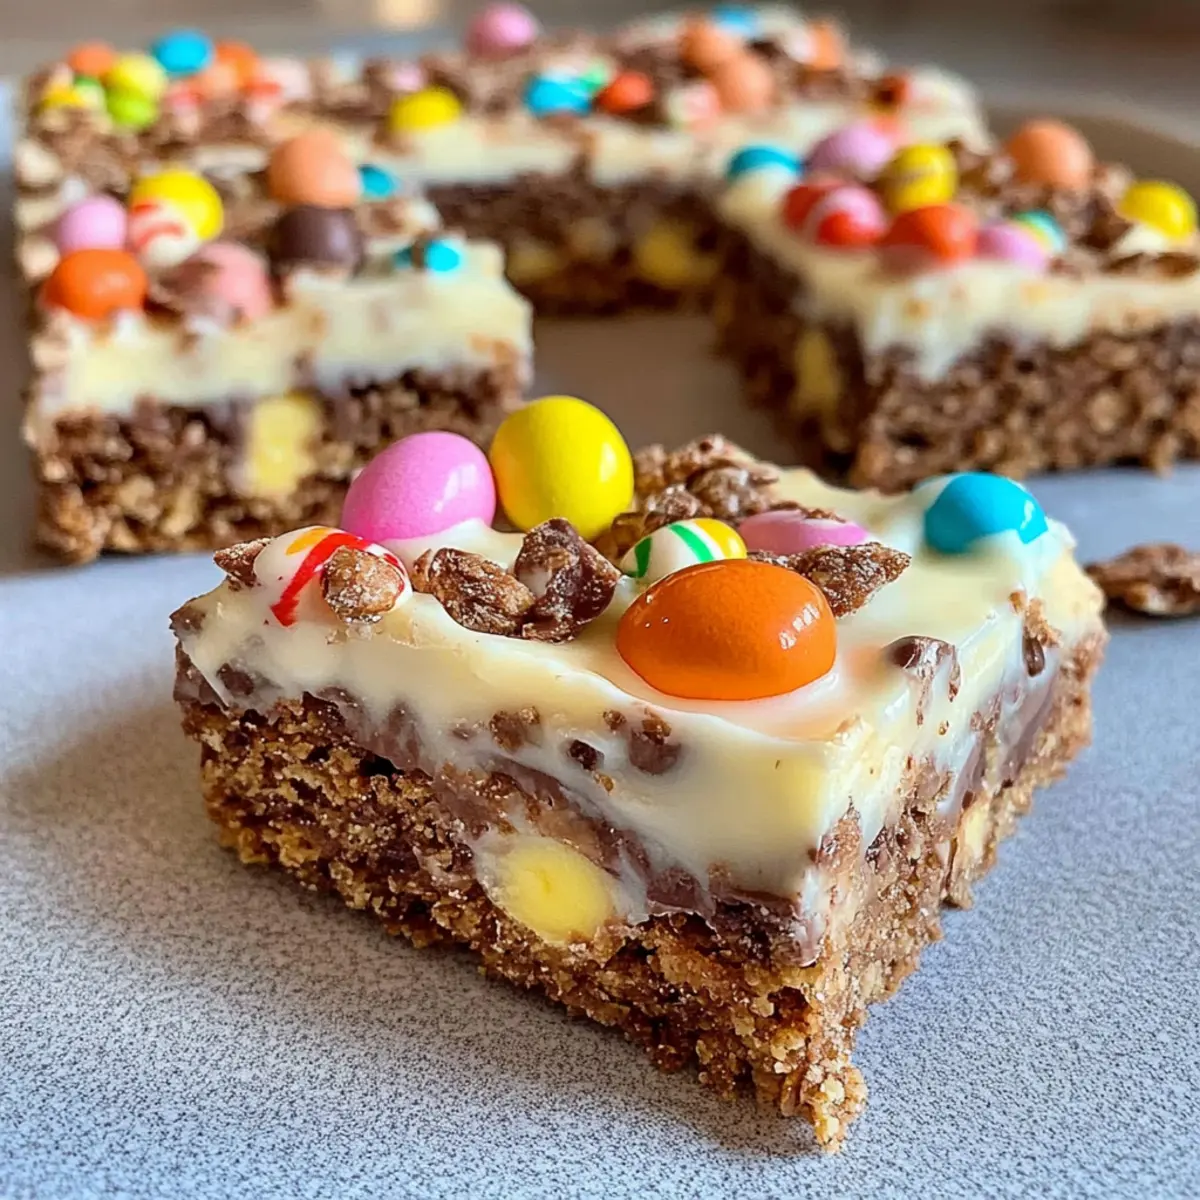
Once your chocolate mixture is smooth, remove it from the microwave and let it cool slightly. Stir in the crushed biscuits and cornflakes (or rice bubbles) until everything is well combined; this should create a thick, chunky texture. Press the mixture evenly into the prepared tin, using the back of a spoon to compact it firmly, creating a solid base for your No-Bake Chocolate Easter Egg Slice.
Step 4: Melt the White Chocolate
In another microwave-safe bowl, melt the white chocolate with one teaspoon of vegetable oil. Heat in 30-second increments, stirring until it’s glossy and smooth. This melted chocolate will form the delightful topping, so be patient—ensure there are no lumps for a beautiful finish.
Step 5: Pour and Spread the Topping
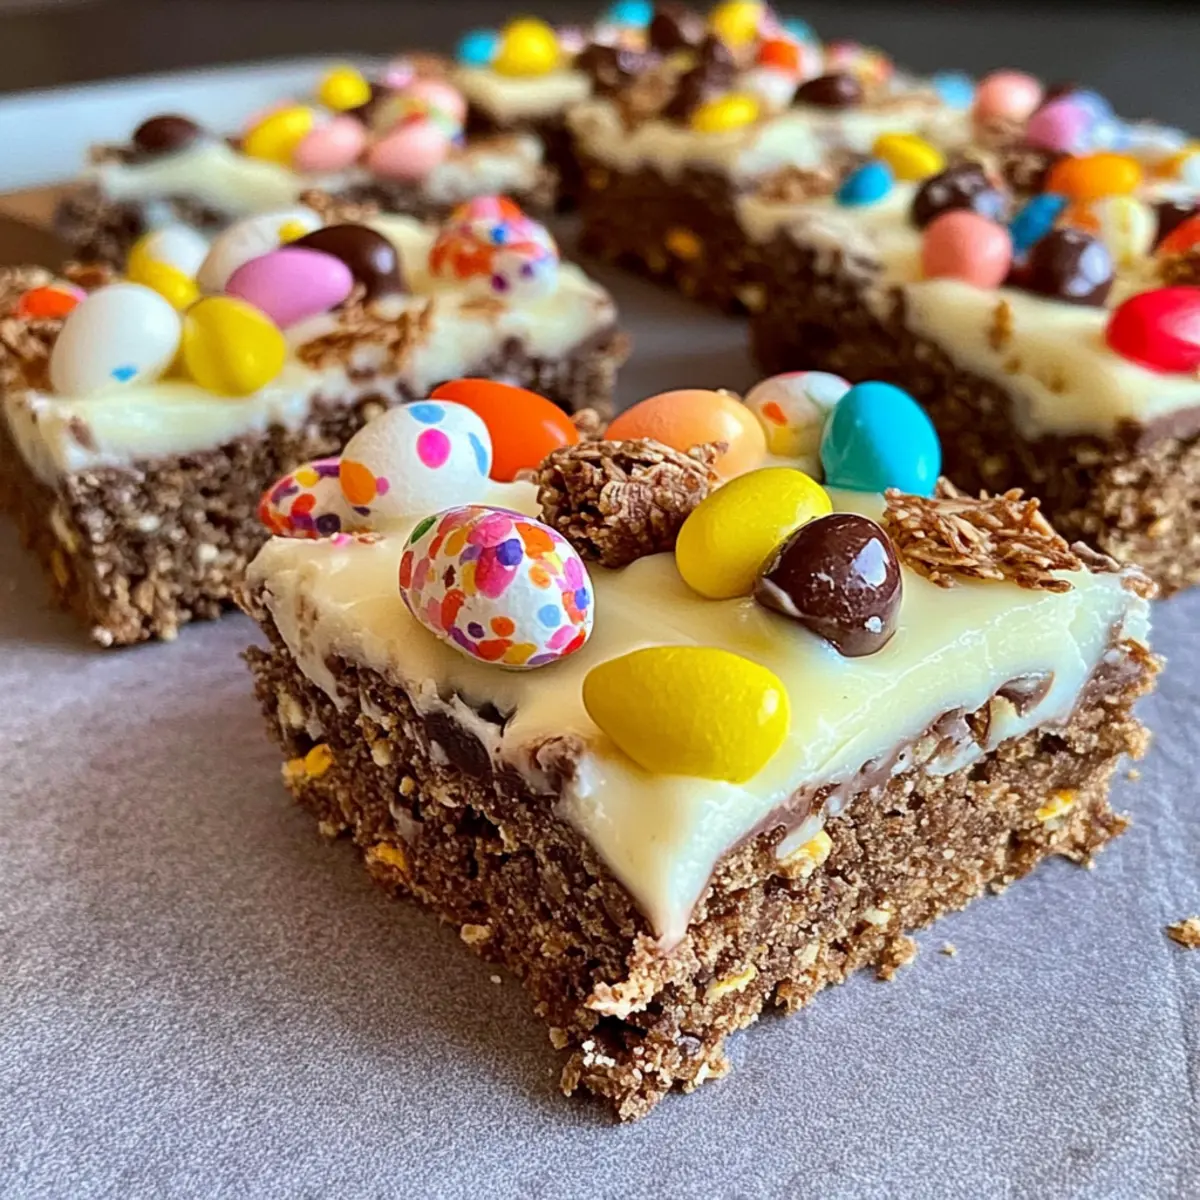
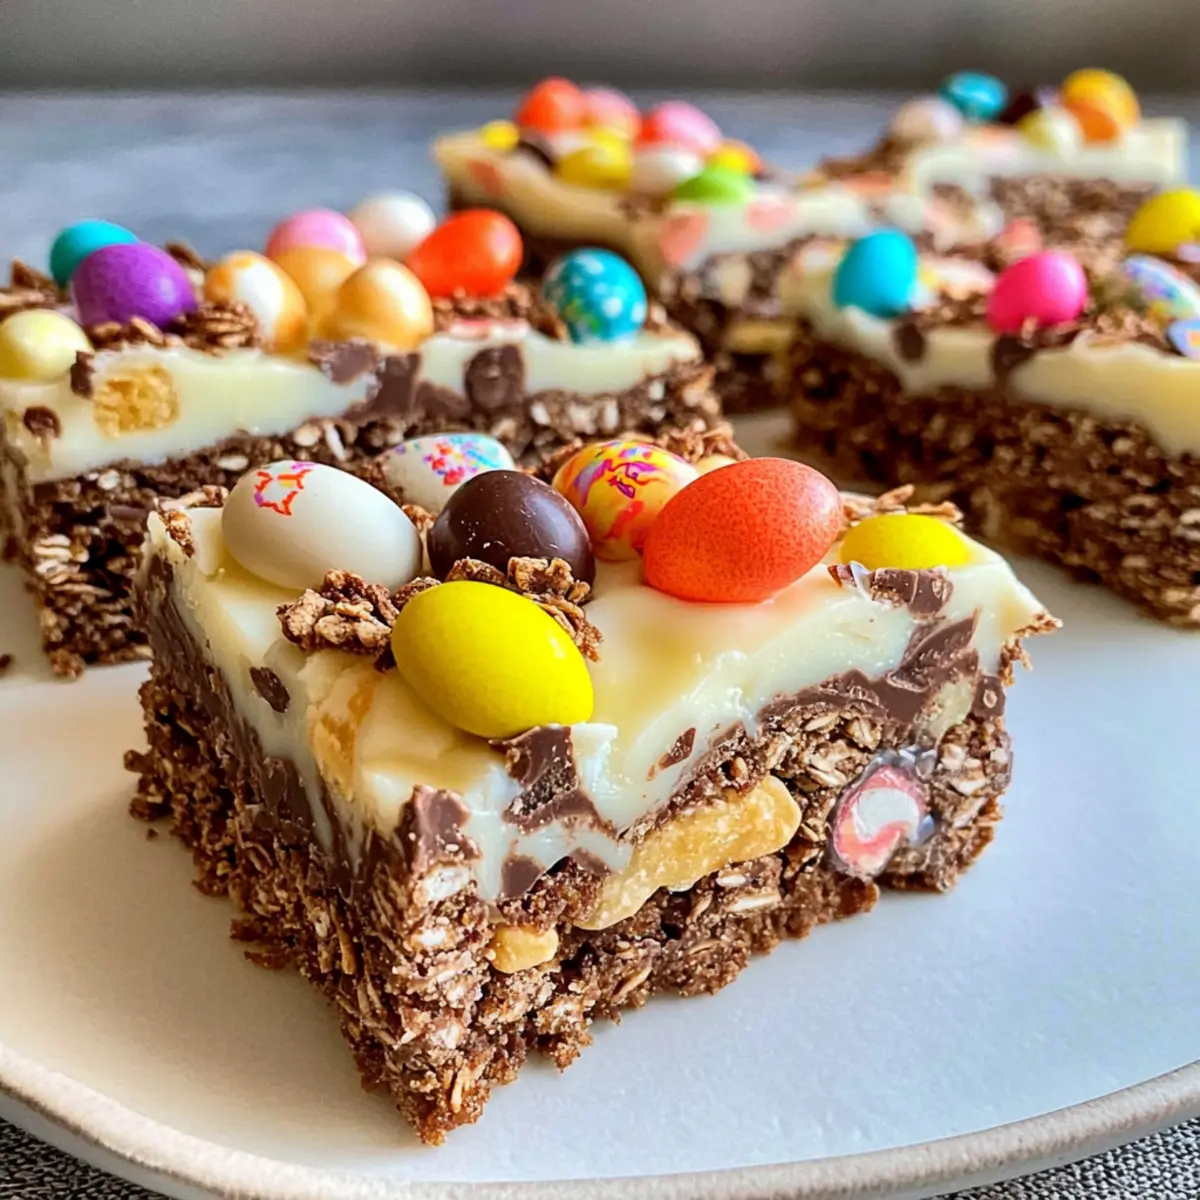
Once the white chocolate is ready, pour it over the chilled chocolate base in the tin. Use a spatula to spread it into an even layer, ensuring it covers the base completely. This will create a lovely contrast between the dark and white chocolate layers, enhancing your No-Bake Chocolate Easter Egg Slice’s visual appeal.
Step 6: Decorate the Slice
Now it’s time for a bit of fun! Decorate the top of your slice with halved Caramello eggs, mini eggs, and Smarties for a festive touch. Feel free to sprinkle with additional decorative sprinkles for that perfect finish. The vibrant colors and festive candies will make this dessert pop, inviting everyone to indulge.
Step 7: Chill the Slice
Place the decorated slice in the fridge to chill for at least 4 hours, or ideally overnight, until it is fully set. This process allows the layers to fuse together beautifully and firm up, ready for slicing. Remember to remove it from the fridge about 20 minutes before cutting for easier handling.
Step 8: Cut and Serve
Once set, lift the No-Bake Chocolate Easter Egg Slice out of the tin using the edges of the baking paper. Using a sharp knife, slice into even squares or rectangles for serving. For cleaner cuts, you may heat the knife slightly—it makes a world of difference! Enjoy your delicious creation!
What to Serve with No-Bake Chocolate Easter Egg Slice
There’s nothing quite like pairing your dessert with delightful sides to create a truly memorable meal.
-
Creamy Vanilla Ice Cream: Large scoops of creamy vanilla ice cream enhance the rich chocolate flavors while adding a deliciously cool contrast.
-
Fresh Berries: Juicy strawberries, raspberries, or blueberries offer a refreshing burst of tartness that beautifully balances the sweetness of the slice.
-
Chocolate Dipped Strawberries: For the ultimate chocolate lover’s experience, serve chocolate dipped strawberries alongside. Their freshness complements the indulgent chocolate slice perfectly.
-
Whipped Cream: Light and airy whipped cream adds a delightful creaminess, making each bite of the slice feel luxurious and indulgent.
-
Mint Tea: A soothing cup of mint tea brings a refreshing element that cuts through the sweetness, providing a harmonious balance.
-
Easter Egg Hunt Snack Board: Create a vibrant snack board with colorful candies, nuts, and cheese for a fun, interactive side that invites guests to nibble while enjoying their chocolate slice.
-
Homemade Lemonade: The zesty taste of homemade lemonade offers a bright and refreshing drink option that’s perfect for gatherings.
-
Coffee: A rich cup of coffee enhances the chocolate flavors, making every bite of the No-Bake Chocolate Easter Egg Slice even more satisfying.
-
Carrot Cake Bites: For a festive touch, serve mini carrot cake bites for a rustic, sweet pairing that brings an Easter twist to the table.
Expert Tips for No-Bake Chocolate Easter Egg Slice
Chill Overnight: Allowing the slice to chill overnight enhances the flavor and sets the layers perfectly, achieving the best texture.
Gentle Mixing: When adding cornflakes, mix them in gently to avoid a soggy texture, ensuring your No-Bake Chocolate Easter Egg Slice remains crunchy.
Hot Knife Trick: For cleaner cuts, run a knife under hot water, wipe it dry, and slice the dessert. This gives you neat edges, perfect for presentation!
Customization Freedom: Feel free to swap toppings based on your personal favorites or seasonal candy, giving your slice a unique twist every time.
Watch the Temperature: Melt chocolate in short bursts to prevent overheating; burned chocolate can ruin the flavor of your slice.
How to Store and Freeze No-Bake Chocolate Easter Egg Slice
Fridge: Store the No-Bake Chocolate Easter Egg Slice in an airtight container for up to one week. It keeps its delightful crunch and flavor perfectly this way!
Freezer: For longer storage, freeze the slices in an airtight container for up to 3 months. Just separate layers with parchment paper to prevent sticking.
Thawing: When ready to enjoy, thaw in the fridge overnight before serving. This keeps the slice texture just right while letting all flavors meld beautifully.
Reheating: No need to reheat; simply serve chilled!
Make Ahead Options
These No-Bake Chocolate Easter Egg Slices are a fantastic choice for meal prep! You can prepare the entire slice up to 24 hours in advance, allowing the flavors to meld beautifully. To make ahead, simply follow the recipe instructions until you’ve decorated the top with candies. Cover the slice tightly with plastic wrap once it’s set in the fridge to maintain its freshness and prevent it from absorbing other odors. When you’re ready to serve, take it out 20 minutes beforehand to soften slightly for easier slicing. With these steps, you’ll be able to enjoy a delicious treat without the last-minute rush!
No-Bake Chocolate Easter Egg Slice Variations
Feel free to sprinkle in your own creativity into this recipe, customizing it to delight your taste buds!
-
Seasonal Swaps: Substitute Easter eggs with Halloween candies for a spooky twist or summer goodies for a festive treat.
-
Nutty Crunch: Fold in chopped nuts, like almonds or pistachios, between the layers for a savory bite and delightful crunch.
-
Fruit Fusion: Mix in dried fruits such as cranberries or apricots for a burst of chewy sweetness that complements the chocolate.
-
Gluten-Free Goodness: Use gluten-free biscuits in place of traditional ones to make this indulgent slice accessible for all.
-
Spicy Twist: Add a pinch of cinnamon or cayenne pepper to the chocolate for a warm, slow-building heat that surprises your palate.
-
Dark Chocolate Delight: Swap the white chocolate top with dark chocolate to intensify the flavor and satisfy chocolate lovers.
-
Vegan Variation: Replace condensed milk and butter with coconut cream and plant-based butter for a tasty vegan-friendly treat.
-
Crunchy Toppings: Instead of standard sprinkles, try crushed cookies or cacao nibs on top for an exciting texture contrast.
Pair your No-Bake Chocolate Easter Egg Slice with something refreshing to balance the sweetness, like Egg Cheese Toasts for an impressive brunch, or explore the delicious layers of a creamy Strawberry Crunch Cheesecake as a delightful dessert option. Enjoy your culinary journey!
No-Bake Chocolate Easter Egg Slice Recipe FAQs
What type of chocolate is best for the base?
Absolutely! Dark chocolate is recommended for its rich flavor, but you can absolutely use semi-sweet or milk chocolate if you prefer a sweeter taste. Just remember that the quality of chocolate will affect the overall flavor of your No-Bake Chocolate Easter Egg Slice.
How should I store the No-Bake Chocolate Easter Egg Slice?
For optimal freshness, store your slices in an airtight container in the fridge for up to one week. This keeps the dessert nice and crunchy, ready to delight your taste buds whenever a craving hits.
Can I freeze the No-Bake Chocolate Easter Egg Slice?
Yes, you can! To freeze your slices, wrap each piece in plastic wrap and then place them in an airtight container for up to 3 months. This prevents them from sticking together, letting you enjoy a delightful treat later. When you’re ready to indulge, simply thaw them in the fridge overnight.
What should I do if my slice is too soft to cut?
If your No-Bake Chocolate Easter Egg Slice is too soft or crumbly when you try to cut it, this might mean it needs more chilling time. Chill it for an additional hour or so. For neater cuts, use a hot knife—heat it under hot water, dry it off, and then slice through the dessert!
Are there any common allergens in this recipe?
Yes, this recipe contains dairy (chocolate, butter, and condensed milk), which may be a concern for some. For a dairy-free version, you can substitute butter with coconut oil and use dairy-free chocolate. Additionally, always check labels on biscuits and any candies to avoid any potential allergens.
Can pets eat the chocolate slice?
No, chocolate is toxic to pets, especially dogs and cats. It’s best to keep this indulgent No-Bake Chocolate Easter Egg Slice away from your furry friends to ensure their safety and health.
No-Bake Chocolate Easter Egg Slice That'll Wow Your Guests
Ingredients
Equipment
Method
- Prepare the tin by lining a 19 x 29 cm slice tin with baking paper, ensuring it hangs over the edges for easy removal.
- In a microwave-safe bowl, combine the dark chocolate, condensed milk, and butter. Microwave in 30-second bursts until completely melted and smooth.
- Stir in the crushed biscuits and cornflakes (or rice bubbles) until well combined, then press evenly into the prepared tin.
- Melt the white chocolate with one teaspoon of vegetable oil in another microwave-safe bowl until glossy and smooth.
- Pour the melted white chocolate over the chilled chocolate base and spread it into an even layer.
- Decorate with halved Caramello eggs, mini eggs, and Smarties for a festive touch, and optionally add sprinkles.
- Chill the slice in the fridge for at least 4 hours or ideally overnight until fully set.
- Lift the slice out of the tin using the edges of the baking paper and slice into even squares or rectangles for serving.
Leave a Reply