
With laughter and joy swirling around the kitchen, I found myself in a delightful mini crisis: how can I elevate my holiday baking game? Enter these Santa hat and bauble cupcakes! Bursting with rich chocolate flavors and topped with creamy icing, these festive treats are a true crowd-pleaser that will enchant your guests at seasonal gatherings. Not only are they visually stunning, but they also offer a fun twist that combines whimsy with deliciousness, making them perfect for celebrating the spirit of Christmas. Ready to embark on a cupcake adventure that’s as festive as it is tasty? Let’s dive in and create some holiday magic together!

Why Are These Cupcakes So Festive?
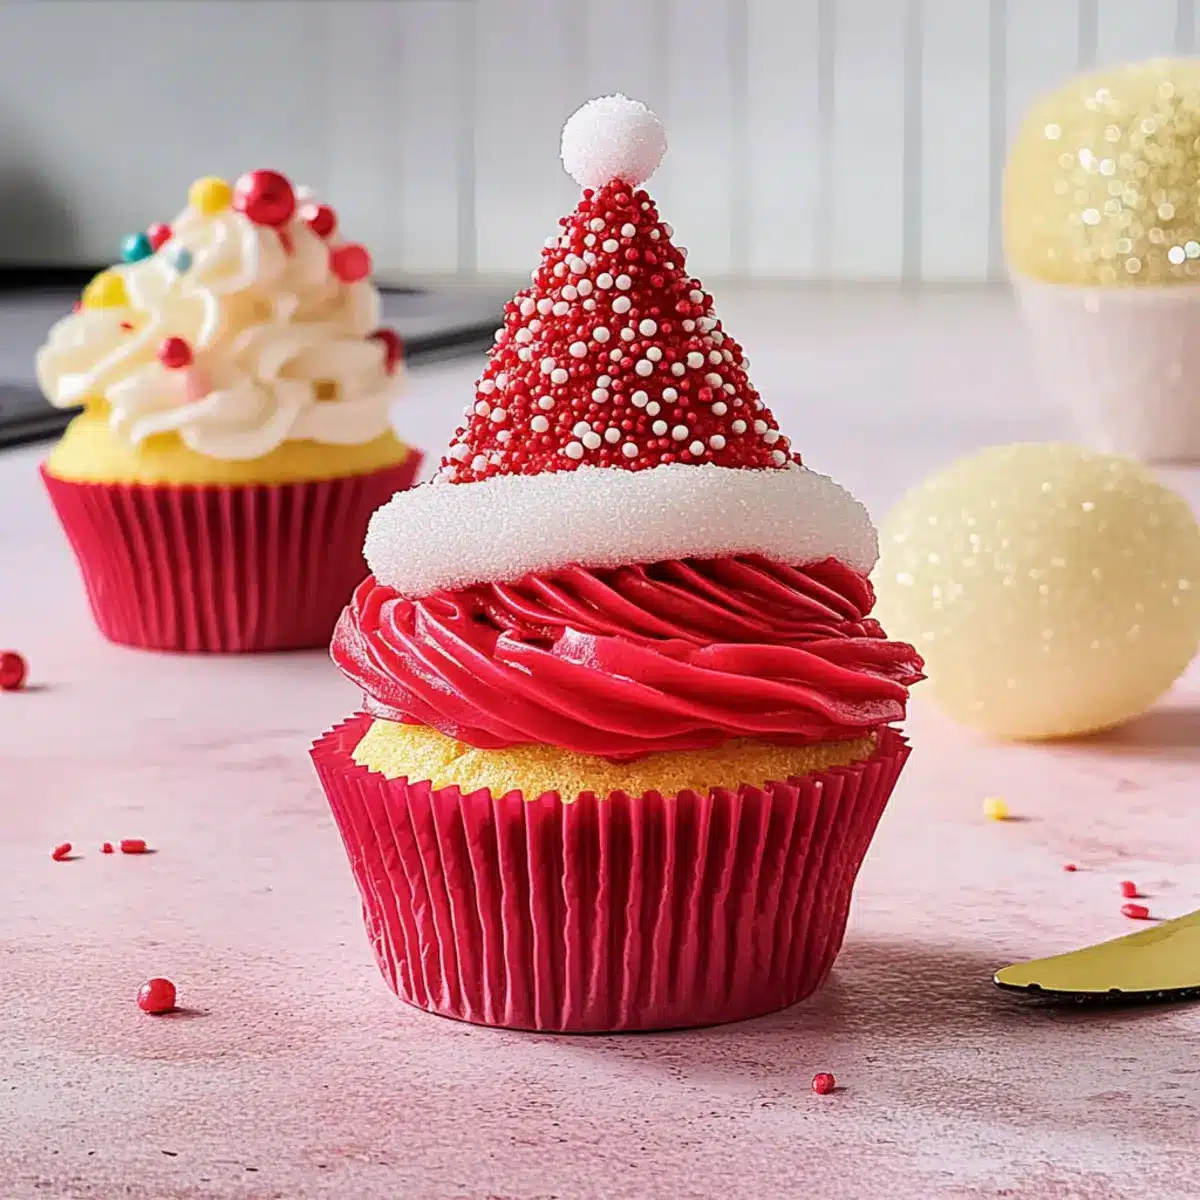
Delightfully charming, these Santa hat and bauble cupcakes transform your holiday gatherings into a whimsical treat experience. Rich chocolate flavor paired with creamy icing creates an indulgent bite that will wow your guests. Visually striking, their festive design not only serves as a dessert but as a conversation starter, adding to your table’s cheer. Easy to customize, feel free to play with icing flavors or substitute sprinkles for every occasion. Perfect for sharing, they’re sure to become a hit, reminiscent of the joy found in every festive gathering. For an even broader holiday menu, consider pairing these with heartwarming Wholesome Summer Chowder or delicious Egg Cheese Toasts.
Santa Hat and Bauble Cupcakes Ingredients
Revamp your festive baking with these irresistible Santa hat and bauble cupcakes!
For the Cupcake Batter
- Unsalted Butter (250g) – Adds richness and moisture; substitute with margarine for a dairy-free option.
- White Chocolate (150g) – Provides sweetness and creaminess; use dark chocolate for a deeper flavor.
- Caster Sugar (2 cups) – Sweetens the cupcakes; brown sugar can add depth of flavor.
- Milk (1 cup) – Keeps the batter moist; almond or oat milk can be used as non-dairy alternatives.
- Plain Flour (1.5 cups) – Creates structure; gluten-free flour blends can also be used.
- Self-Raising Flour (0.5 cups) – Provides a light texture; can be replaced with all-purpose flour and baking powder (1 tsp).
- Table Salt (0.25 tsp) – Enhances flavor; no alternative is needed.
- Vanilla Extract (2 tsp) – Adds flavor; almond extract can be a flavorful substitution.
- Free-Range Eggs (2) – Binds ingredients and adds moisture; use flaxseed meal mixed with water for a vegan option.
For the Cream Cheese Icing
- Cream Cheese (500g) – Base for icing; adds tang; mascarpone can be used for a milder flavor.
- Unsalted Butter (150g, softened) – Creates a rich icing; margarine serves as a vegan option.
- Icing Sugar Mixture (3 cups) – Sweetens icing; powdered monk fruit can be an alternative for lower sugar.
- Red Food Coloring Gel – For coloring icing; natural beet juice can be a substitute.
For Decoration
- White Chocolate (30g, melted) – For decoration and to add a touch of elegance.
- Mixed Gold and Silver Sprinkles (2 cups) – Adds a festive touch; use any colored sprinkles for variation.
- Mixed Red, Pink, and White Sprinkles (2 cups) – Create the bauble effect, making it visually appealing.
Dive into this festive adventure with your Santa hat and bauble cupcakes, perfect for sharing with loved ones!
Step‑by‑Step Instructions for Santa Hat and Bauble Cupcakes
Step 1: Preheat and Prepare
Begin your festive journey by preheating your oven to 160°C (or 140°C for fan-forced). While the oven warms, line two 12-hole muffin pans with cheerful paper cases, setting the stage for your delightful Santa hat and bauble cupcakes. This preparation will ensure that your cupcakes bake evenly and can be effortlessly removed once done.
Step 2: Melt the Base Ingredients
In a medium saucepan, gently melt together 250g of unsalted butter, 150g of white chocolate, 2 cups of caster sugar, and 1 cup of milk over low heat. Stir frequently until everything is beautifully combined and smooth, looking for a silky consistency. Allow the mixture to cool slightly as it transforms into a rich base for your cupcake batter.
Step 3: Combine Dry Ingredients
In a large mixing bowl, whisk together 1.5 cups of plain flour, 0.5 cups of self-raising flour, and a pinch of salt (0.25 tsp). This blend will give your cupcakes that light, fluffy texture we all adore. Make sure this mixture is well combined and set aside, waiting to join the rich melted ingredients in the next step.
Step 4: Create the Cupcake Batter
Once cooled slightly, whisk in 2 teaspoons of vanilla extract and 2 free-range eggs into the melted mixture until beautifully mixed. Gradually add the flour mixture and stir gently until just combined, making sure to avoid overmixing. Pour the batter halfway into your prepared muffin pans, filling them evenly, and bake for 30-35 minutes or until a skewer inserted in the center comes out clean.
Step 5: Cool the Cupcakes
After baking, remove the muffin pans from the oven and let them cool for about 10 minutes. Once slightly cooled, carefully transfer the cupcakes to a wire rack to cool completely. This cooling time is crucial to ensure that the cupcakes maintain their soft texture and are ready for delicious icing.
Step 6: Prepare the Cream Cheese Icing
In a mixing bowl, beat together 500g of cream cheese and 150g of softened unsalted butter until creamy and fluffy. Gradually add in 3 cups of icing sugar, continuing to beat until smooth. Reserve half a cup of this icing for later, then color the remaining mixture with red food coloring gel until you reach a vibrant hue perfect for Santa’s hats.
Step 7: Decorate the Santa Hats
Using a piping bag, pipe the red icing onto the cooled cupcakes to create the classic Santa hat shape. Use the reserved white icing to pipe details, such as a fluffy brim and pom-pom at the top of each hat. Refrigerate the decorated cupcakes for about 30 minutes to allow the icing to set firmly, ensuring a delightful appearance.
Step 8: Create the Bauble Decorations
To make the bauble decorations, pipe melted white chocolate into circular ring shapes on a baking sheet lined with parchment paper. Place these rings in the refrigerator to firm up while you continue with the cupcake decorating, adding a whimsical touch to your Santa hat and bauble cupcakes.
Step 9: Apply the Icing for Baubles
For the bauble cupcakes, once the icing is set, beat butter until light and creamy, then add icing sugar and vanilla until fluffy. Scoop this icing onto the top of the cupcakes, creating cute dome shapes. Immediately coat the tops with your mixed gold and silver sprinkles to give the baubles a festive look, inviting everyone to marvel at your creativity.
Step 10: Finishing Touches
Affix the reserved white icing around the base of each cupcake, creating a snowy effect. Carefully insert the chilled white chocolate rings into each cupcake for that lovely festive decoration. After decorating, place your Santa hat and bauble cupcakes in the refrigerator for an additional 30 minutes to let everything set before serving these delightful treats at your holiday gathering.

What to Serve with Santa Hat and Bauble Cupcakes
When you’re ready to spread holiday cheer, complement these delightful cupcakes with equally festive treats and beverages.
- Rich Hot Cocoa: Perfectly pairs with the sweet chocolate flavor and creamy icing, warming your heart and soul during chilly holiday gatherings.
- Spiced Eggnog: Its rich, creamy texture and festive spices create a delightful contrast to the sweetness of the cupcakes, adding holiday spirit.
- Gingerbread Cookies: With their spiced warmth, these cookies are a classic, offering an additional festive flavor that delights every palate at your holiday table.
For an added touch, consider providing a selection of toppings like mini marshmallows or peppermint sticks alongside your hot cocoa, encouraging guests to customize their holiday experience.
- Fruit Salad: A burst of fresh flavors brightens up the dessert table, cutting through the sweetness and providing a refreshing balance amidst the rich cupcakes.
- Cheesecake Bites: Creamy and decadent, these mini desserts complement the cupcakes’ textures while offering a fun variety of flavors and presentation.
- Pumpkin Pie: The comforting autumn flavors resonate with the holiday spirit and tie together the theme, creating a nostalgic and delightful dining experience.
For a toast to holiday memories, pair your treats with a sparkling drink like festive sparkling cider, enticing your guests and enhancing your joyous celebrations!
Expert Tips for Santa Hat and Bauble Cupcakes
-
Don’t Overmix: Ensure the batter is just combined; overmixing can lead to dense cupcakes instead of the light, fluffy texture you want.
-
Choose the Right Chocolate: Use quality white chocolate for melting and decorating. Lower-quality chocolate can separate or not set properly.
-
Steady Piping: When piping the icing, maintain even pressure to create uniform designs. Practice on parchment paper if you’re new to piping.
-
Cooling Time Matters: Allow cupcakes to cool completely before icing. This prevents the icing from melting and slipping off, preserving your festive look.
-
Creative Substitutions: Feel free to swap in different flavored icings or sprinkles to create variations of your Santa hat and bauble cupcakes, ensuring everyone enjoys a slice of holiday cheer!
Make Ahead Options
These Santa hat and bauble cupcakes are perfect for meal prep enthusiasts! You can prepare the cupcake batter and bake them up to 24 hours in advance. Simply cool the cupcakes completely, then store them in an airtight container at room temperature to maintain their fluffy texture. For the icing, you can create the cream cheese mixture and refrigerate it for up to 3 days; just remember to give it a quick stir before decorating. When you’re ready to serve, pipe the icing and add your festive decorations, which can also be prepped ahead. This way, your holiday baking is stress-free, allowing for more quality time with loved ones!
Storage Tips for Santa Hat and Bauble Cupcakes
Room Temperature: Store uniced cupcakes in an airtight container at room temperature for up to 3 days; they’ll stay fresh and delightful.
Fridge: If you’ve already decorated your Santa hat and bauble cupcakes, keep them in the refrigerator for up to 5 days to maintain the creamy icing and prevent melting.
Freezer: For longer storage, freeze the cupcakes (unfrosted) in an airtight container for up to 2 months. Thaw overnight in the fridge before decorating.
Reheating: If desired, warm slightly in the microwave for 10-15 seconds to enjoy a soft, gooey center, enhancing the festive flavors of your Santa hat and bauble cupcakes.
Santa Hat and Bauble Cupcakes Customization
Feel free to get creative and make these sweet treats your own with these delightful variations!
- Dairy-Free: Substitute unsalted butter and cream cheese with margarine and dairy-free cream cheese for a tasty alternative that everyone can enjoy.
- Gluten-Free: Use gluten-free flour blends in place of all-purpose flour for cupcakes that are equally delicious without the gluten.
- Flavor Twist: Add 1 teaspoon of peppermint extract to the batter for a refreshing holiday flavor that dances on the taste buds.
- Colorful Sprinkles: Swap the gold and silver sprinkles for vibrant rainbow sprinkles to give the baubles a fun twist for celebrations beyond Christmas.
- Chocolate Lovers: Fold in chocolate chips (dark or white) into the batter for an extra burst of chocolaty goodness in every bite.
- Fruity Delight: Mix in some dried cranberries or chopped nuts into the batter for texture and a fruity complement to the rich chocolate.
- Minis: Make mini versions of these cupcakes by using a mini muffin pan; they’re perfect for little hands and holiday parties.
- Boozy Boost: Add a splash of your favorite liqueur, like Baileys or Kahlúa, to the icing for an adult-friendly treat.
Don’t forget, if you’re looking to create a cohesive holiday spread, pair these cupcakes alongside a bowl of heartwarming Lemon Chicken Potatoes or some delightful New Orleans Shrimp for a festive feast!

Santa Hat and Bauble Cupcakes Recipe FAQs
How do I choose the right chocolate for these cupcakes?
Absolutely! For the best flavor, choose high-quality white chocolate for melting and decorating your Santa hat and bauble cupcakes. Lower-quality options can separate or not melt smoothly, affecting the overall taste and presentation. Look for chocolate that has a high cocoa butter content for a creamy texture in both the batter and the decorations.
What’s the best way to store leftover cupcakes?
To keep your festive cupcakes fresh, store uniced cupcakes in an airtight container at room temperature for up to 3 days. If already decorated, place them in the refrigerator where they’ll last for about 5 days. This helps maintain the creamy icing without the risk of melting during warmer temperatures!
Can I freeze the cupcakes for later?
Yes, indeed! To freeze the Santa hat and bauble cupcakes, I recommend doing so before they’re frosted. Place the uniced cupcakes in an airtight container and freeze for up to 2 months. When you’re ready to enjoy them, simply thaw overnight in the refrigerator, then go ahead and decorate as desired. Enjoying freshly made cupcakes at your holiday gathering feels just like magic!
What if my cupcake batter is too thick?
Very good question! If you find your batter too thick, it could be due to overmixing or incorrect ingredient ratios. To remedy this, gently fold in a tablespoon or two of milk to loosen the batter before filling your cupcake liners. Remember, a light mixing action is key to achieving that fluffy texture we all love!
Are these cupcakes suitable for people with allergies?
While these Santa hat and bauble cupcakes feature common allergens like dairy and gluten, you can definitely make them allergy-friendly! Use dairy-free butter, non-dairy milk, and a gluten-free flour blend. For egg-free options, consider substituting with flaxseed meal mixed with water (1 tablespoon flaxseed meal + 2.5 tablespoons water = 1 egg). Always check labels for cross-contamination to ensure safety.
What does it mean to “pipe” icing, and how can I do it?
Piping is a lovely way to apply icing beautifully! To pipe icing onto your cupcakes, you’ll need a piping bag fitted with a nozzle of your choice. Fill the bag with icing, holding it at the top to prevent spills. With steady pressure, squeeze from the top and guide it to create desired designs, such as swirls or borders. If you’re new to piping, you can practice on parchment paper first to build your confidence!
Santa Hat and Bauble Cupcakes That Brighten Your Holidays
Ingredients
Equipment
Method
- Preheat your oven to 160°C (or 140°C for fan-forced) and line two 12-hole muffin pans with paper cases.
- Melt together 250g of unsalted butter, 150g of white chocolate, 2 cups of caster sugar, and 1 cup of milk over low heat, stirring until smooth.
- In a large bowl, whisk together 1.5 cups of plain flour, 0.5 cups of self-raising flour, and 0.25 tsp of salt. Set aside.
- Once the melted mixture is slightly cooled, whisk in 2 tsp of vanilla extract and 2 eggs. Gradually add the flour mixture and stir gently.
- Pour batter into prepared muffin pans and bake for 30-35 minutes or until a skewer comes out clean.
- Let the cupcakes cool in the pans for 10 minutes before transferring to a wire rack to cool completely.
- Beat together 500g of cream cheese and 150g of softened butter, then gradually add 3 cups of icing sugar until smooth. Reserve half a cup for later and color the rest with red food coloring.
- Pipe the red icing onto cooled cupcakes to create Santa hat shapes. Use the reserved white icing for details and refrigerate to set.
- Pipe melted white chocolate into circular rings on parchment and refrigerate to firm while decorating cupcakes.
- For bauble cupcakes, beat butter until creamy, add icing sugar and scoop onto cupcakes, then coat with mixed sprinkles.
- Finish by piping reserved white icing at the base of each cupcake and adding the chilled white chocolate rings for decoration. Refrigerate again before serving.
Leave a Reply