
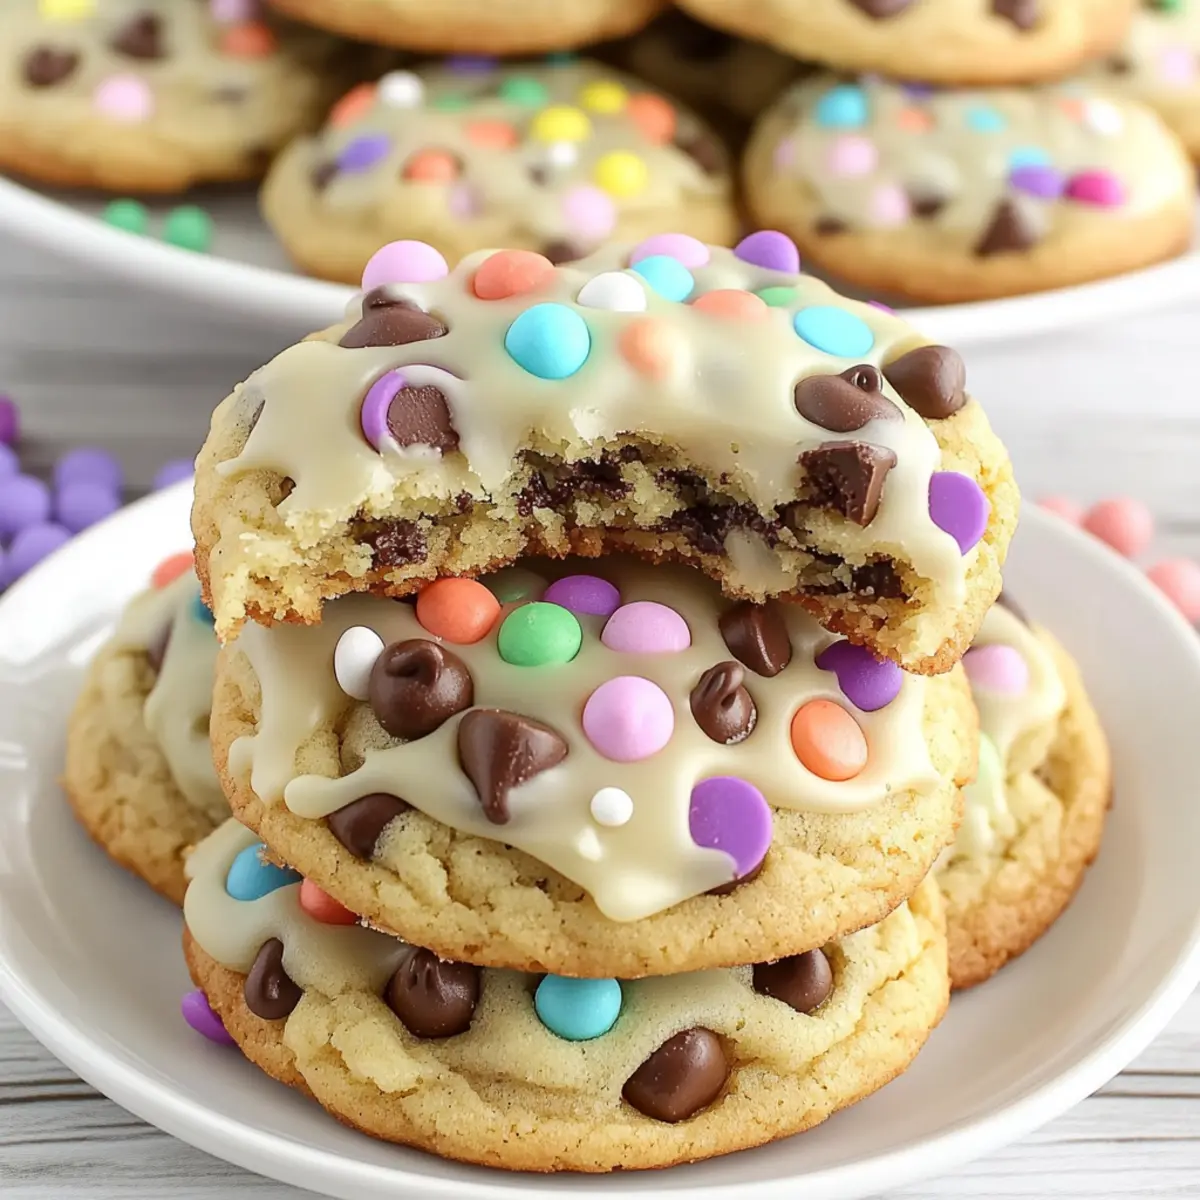
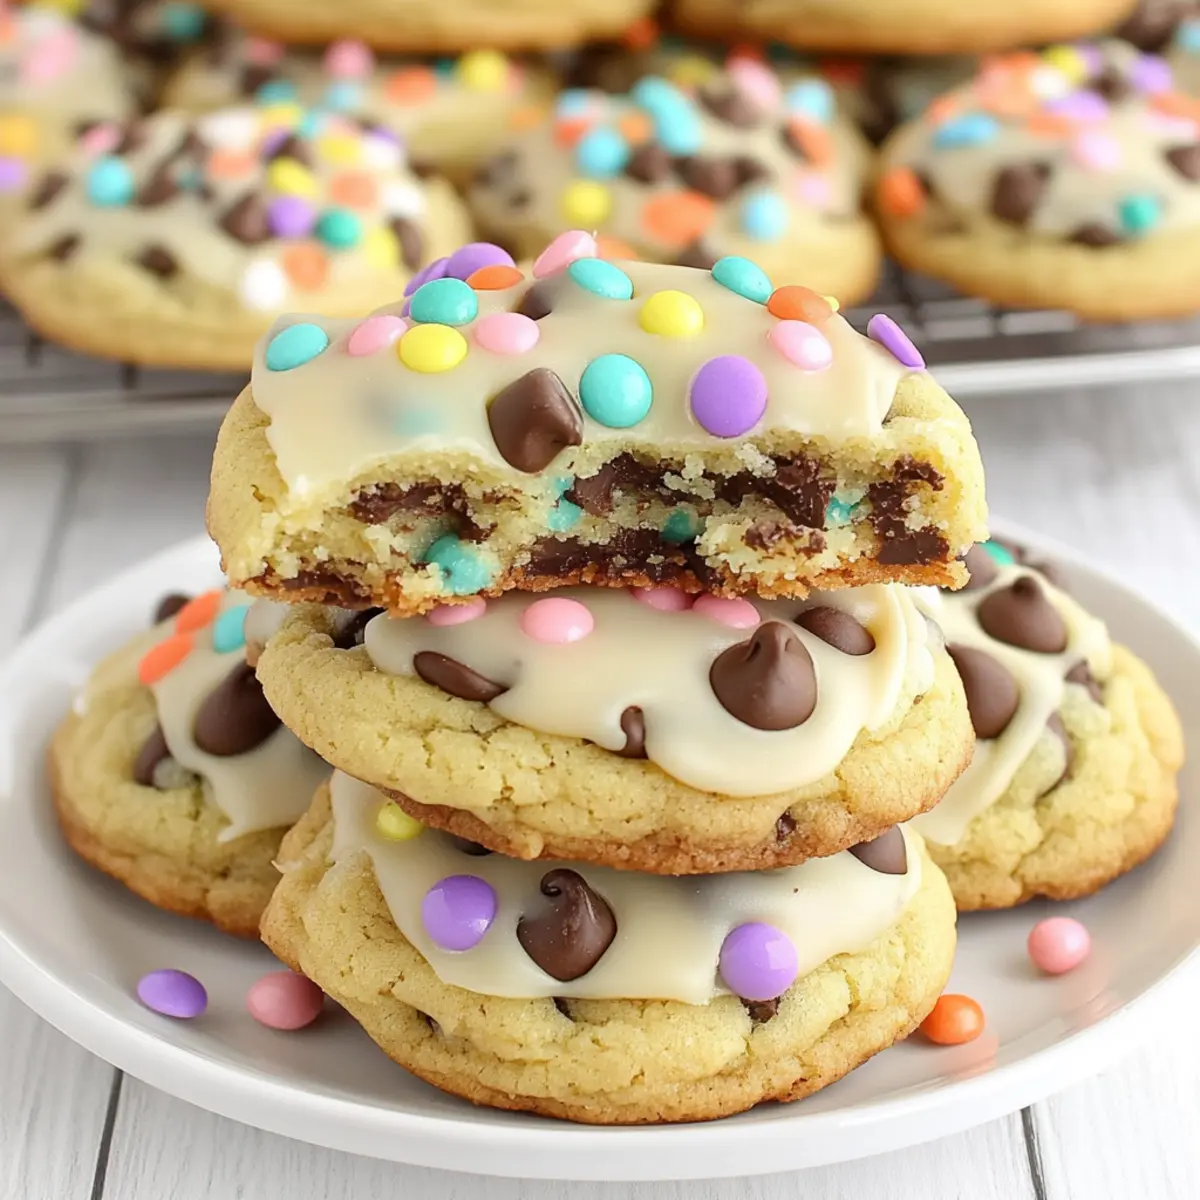
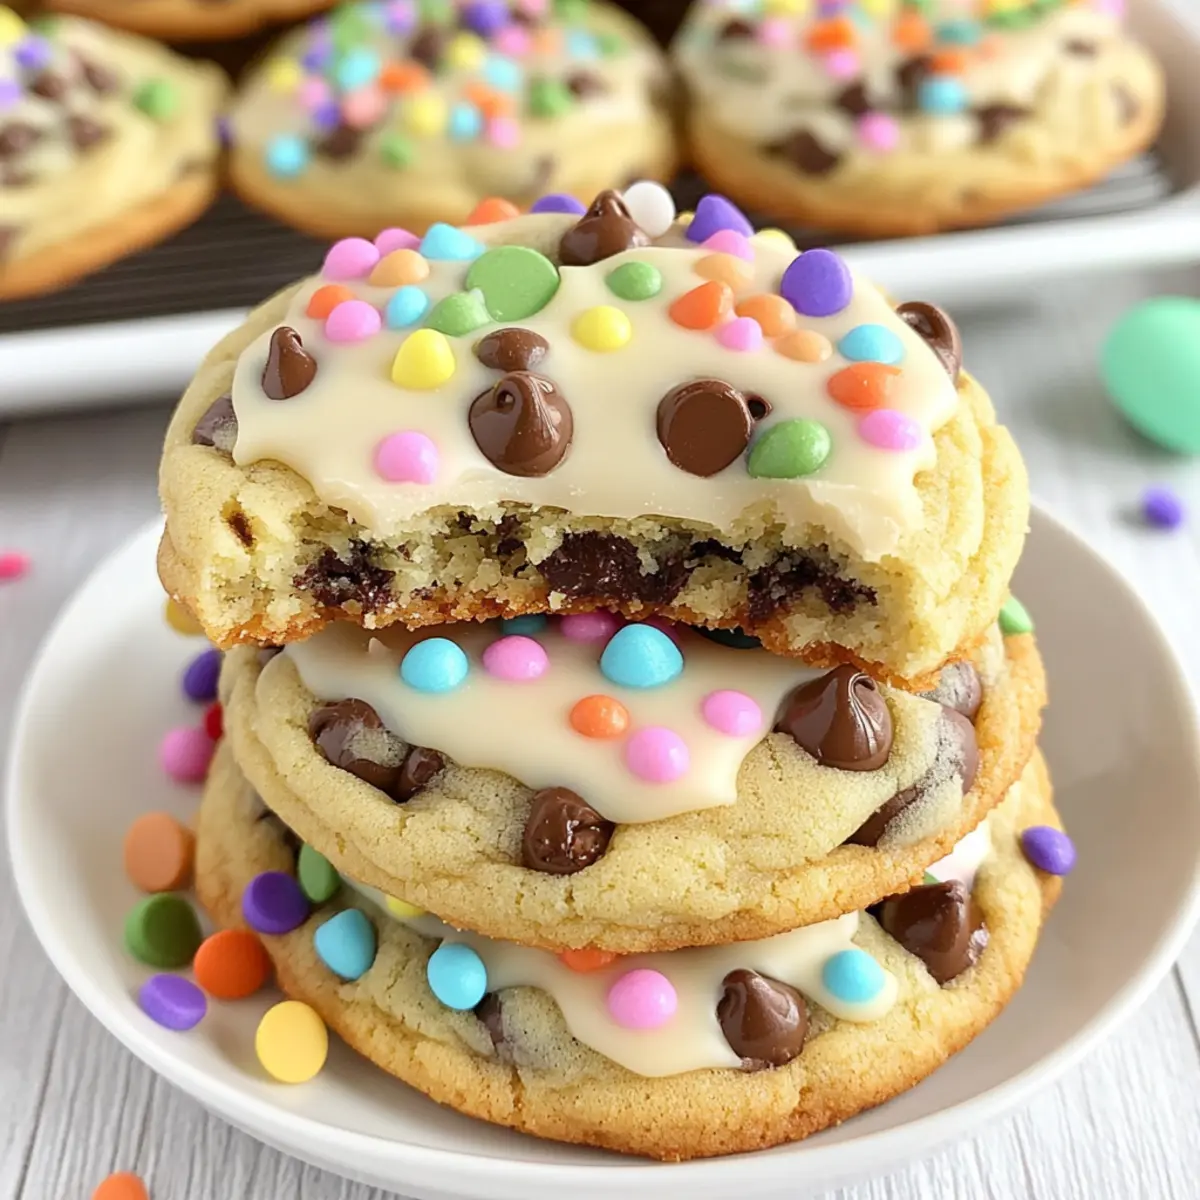
Springtime is here, and with it comes the joy of baking! There’s something magical about the smell of freshly baked cookies wafting through the house, especially when those cookies are festive Easter Chocolate Chip Cookies. These delightful treats are not just your average cookie; they’re a celebration in themselves, with a soft, buttery base and melty chocolate chips waiting to be enjoyed. The addition of melted vanilla bark and a sprinkle of colorful decorations transforms this classic into a perfect center-stage dessert for any spring gathering. Plus, they’re kid-friendly, making them an ideal activity for the whole family. Ready to impress your friends and family with a delightful Easter treat? Let’s hop into the kitchen and make some memories!

What makes these cookies so special?
Festive Spirit: These Easter Chocolate Chip Cookies are a delightful way to celebrate spring with their colorful decorations and cheerful vibe.
Easy and Fun: With simple ingredients and easy instructions, they’re perfect for budding bakers of all ages.
Flavorful Combination: The soft, buttery cookie base pairs wonderfully with rich chocolate chips and creamy vanilla bark for a truly indulgent treat.
Versatile Options: Feel free to customize with different sprinkles, or even add a touch of orange zest for a refreshing twist! For more festive ideas, check out our delicious Easter Smoked Salmon or give our Pumpkin Smores Cookies a try.
Impressive Presentation: These cookies not only taste great but look stunning on any table, making them a hit at spring gatherings and celebrations.
Easter Chocolate Chip Cookies Ingredients
For the Cookies
• Unsalted Butter – For tenderness and rich flavor; soften for easier mixing.
• Granulated Sugar – Provides sweetness and fluffy texture; use brown sugar for deeper flavor.
• Large Egg – Binds ingredients and adds moisture; essential for achieving chewy cookies.
• Pure Vanilla Extract – Enhances flavor; substitute with almond extract for a different twist.
• All-Purpose Flour – Gives structure; a gluten-free blend can be used with tweaks.
• Baking Soda – Acts as a leavening agent; ensure it’s fresh for the best cookie rise.
• Fine Salt – Balances sweetness and enhances flavor; consider Caspian Sea salt for subtle texture.
• Milk Chocolate Chips – Adds sweetness and chocolaty flavor; swap for dark chocolate chips for richness.
For the Decoration
• Vanilla Almond Bark – Provides a smooth, creamy coating for the cookies; melted white chocolate mixed with coconut oil works too.
• Easter-themed Sprinkles – Adds a cheerful visual touch; skip them for a simpler look.
Step‑by‑Step Instructions for Easter Chocolate Chip Cookies
Step 1: Preheat the Oven
Begin by preheating your oven to 190°C (375°F). This is essential for achieving perfectly baked Easter Chocolate Chip Cookies. While the oven heats, gather your ingredients, ensuring everything is ready for mixing. Line a baking sheet with parchment paper for quick cleanup and easy cookie removal.
Step 2: Cream the Butter and Sugar
In a large mixing bowl, use an electric mixer to beat together the softened unsalted butter and granulated sugar until the mixture appears pale and fluffy, approximately 3–4 minutes. This step is crucial for creating a light texture in your cookies, so take your time to achieve that airy consistency.
Step 3: Add the Wet Ingredients
Next, add one large egg and a splash of pure vanilla extract to the creamed mixture. Mix thoroughly until all the ingredients are fully combined, which should take about 1–2 minutes. You’ll know it’s ready when the mixture is smooth and uniform, contributing to the rich flavor of your Easter Chocolate Chip Cookies.
Step 4: Combine Dry Ingredients
In a separate bowl, whisk together the all-purpose flour, baking soda, and fine salt. Gradually incorporate this dry mixture into the wet ingredients, mixing on low speed or stirring gently until a uniform dough forms. This will take about 1–2 minutes; be careful not to overmix, as it can make the cookies tough.
Step 5: Fold in Chocolate Chips
Once your dough is ready, gently fold in the milk chocolate chips using a spatula. This step adds sweetness and provides those delightful chocolatey bites in your Easter Chocolate Chip Cookies. Ensure that the chips are evenly distributed throughout the dough for the best flavor in every bite.
Step 6: Prepare to Bake
Using a tablespoon or cookie scoop, portion out balls of dough and place them on the prepared baking sheet, leaving enough space between each to allow for spreading. Aim for about 2–3 inches apart. This spacing helps your cookies maintain their shape and ensures even baking.
Step 7: Bake the Cookies
Bake the cookies in your preheated oven for 8 to 10 minutes, or until the edges turn a light golden brown. Keep an eye on these treats, as every oven is different. The centers should look slightly soft—this ensures a chewy texture in your Easter Chocolate Chip Cookies.
Step 8: Cool on the Baking Sheet
Once baked, let the cookies rest on the baking sheet for 1 minute. This resting time allows them to firm up slightly. Then transfer them to a wire rack to cool completely, preserving that perfect texture before moving on to decoration.
Step 9: Melt the Vanilla Bark
In a microwave-safe bowl, melt the vanilla almond bark in 30-second intervals, stirring often to avoid burning. This process should take about 1–2 minutes in total. Once smooth and creamy, the melted bark is ready to coat your cookies, enhancing their festive appeal.
Step 10: Decorate the Cookies
Dip the cooled cookies halfway into the melted vanilla bark, allowing any excess to drizzle off. Return them to the baking sheet and immediately sprinkle with colorful Easter-themed sprinkles. This step not only adds flavor but makes your cookies festive and fun, perfect for any holiday celebration.
Step 11: Let the Decoration Set
Chill the decorated cookies for about 20 minutes in the refrigerator until the vanilla bark hardens. This final touch ensures your Easter Chocolate Chip Cookies are beautifully coated and ready for sharing!
Expert Tips for Easter Chocolate Chip Cookies
-
Chill the Dough: Before baking, chilling the dough for at least 30 minutes helps prevent spreading and ensures a thicker, chewier cookie.
-
Measure Flour Correctly: Use the spoon-and-level method to avoid adding too much flour, which can lead to dry cookies.
-
Fresh Baking Soda: Always check your baking soda’s freshness; expired baking soda won’t provide the desired rise, resulting in flat cookies.
-
Cooling Time: Allow cookies to cool completely before dipping in vanilla bark; this prevents the bark from melting and ensures neat decoration.
-
Sprinkle Wisely: Add sprinkles immediately after dipping in the bark, as it sets quickly and will hold the sprinkles better while ensuring your Easter Chocolate Chip Cookies look festive.
Easter Chocolate Chip Cookies Variations
Feel free to put your spin on these delightful cookies to suit your tastes or dietary needs!
- White Chocolate Twist: Swap milk chocolate chips for white chocolate chips for a sweeter and creamier cookie experience.
- Nutty Delight: Add chopped walnuts or pecans for a crunchy contrast to the soft cookie texture. The added nutty flavor will enhance your cookies wonderfully!
- Festive Chocolate Eggs: Incorporate crushed chocolate eggs or pastel M&M’s for extra fun and color, perfect for holiday gatherings. Not only do they taste amazing, but they also bring a cheerful touch to the cookies!
- Fruit Flavored: For a fruity touch, try adding a pinch of cardamom or a teaspoon of orange zest to the dough for a refreshing and aromatic flavor.
- Gluten-Free: Use a gluten-free flour blend to make these cookies friendly for gluten-sensitive folks while still keeping them deliciously soft.
- Spiced Up: Consider incorporating spices like cinnamon or nutmeg into the mix for a warm, cozy flavor that pairs beautifully with the chocolate.
- Less Sweet: Reduce the granulated sugar slightly if you prefer less sweetness; consider using dark chocolate chips for a richer taste that even balances the sugar!
- Colorful Draft: Try adding layers of edible glitter or colored sugar for an extra festive touch—perfect for making these cookies a show-stopping centerpiece!
And if you’re planning to make your celebrations even more festive, don’t forget to check out our elegant Easter Smoked Salmon appetizer or indulge in some cozy Pumpkin Smores Cookies afterwards!
How to Store and Freeze Easter Chocolate Chip Cookies
Room Temperature: Store cookies in an airtight container at room temperature for up to 5 days, keeping them soft and chewy.
Fridge: If you prefer a slightly firmer texture, you can refrigerate them in a sealed container for up to a week.
Freezer: For longer storage, freeze baked cookies, layered between parchment paper, for up to 2 months. Allow them to thaw at room temperature before enjoying.
Reheating: To enjoy warm cookies, simply microwave them for 10-15 seconds or place them in a preheated oven (180°C/350°F) for 5 minutes.
What to Serve with Easter Chocolate Chip Cookies
Spring gatherings deserve to be paired with vibrant flavors that complement the joy of your festive treats.
- Cold Milk: Perfect for dipping, cold milk balances the sweet richness of the cookies and enhances their chocolatey goodness.
- Fresh Fruit Salad: A bright mix of strawberries, blueberries, and pineapple adds a refreshing, fruity contrast to the cookies’ sweetness.
- Coffee or Espresso: The bitter notes of coffee bring out the sweetness of the cookies while providing a warm, comforting beverage for adults.
- Vanilla Ice Cream: Scoop a generous ball of creamy vanilla ice cream to create a delightful cookie sandwich, elevating your dessert experience.
- Lemonade: A tangy, refreshing glass of homemade lemonade offers a citrusy balance that plays beautifully with the rich flavors of the chocolate.
- Chocolate Milkshake: For an indulgent treat, serve up thick chocolate milkshakes that make the whole experience a sweet delight!
- Easter-themed Cupcakes: Keep the festive spirit alive with pastel-colored cupcakes that mirror the appearance of your decorated cookies.
- Buttercream Frosted Brownies: Pair with fudgy brownies topped with buttercream frosting for a chocolate overload that cookie lovers will adore.
Make Ahead Options
These Easter Chocolate Chip Cookies are perfect for busy home cooks looking to save time without sacrificing flavor! You can prepare the cookie dough up to 24 hours in advance; simply cover it tightly and refrigerate. On baking day, scoop the dough onto a baking sheet and bake straight from the fridge; just add a couple of extra minutes to the baking time. Additionally, you can also melt and prepare the vanilla almond bark ahead of time, storing it in a cool spot until you’re ready to dip your cookies. This way, you can enjoy fresh, festive cookies at a moment’s notice, ensuring they taste just as delicious as if made the same day!
Easter Chocolate Chip Cookies Recipe FAQs
How do I choose the best chocolate chips for my cookies?
Absolutely! I recommend using high-quality milk chocolate chips for a classic sweet taste. If you prefer a richer flavor, dark chocolate chips are a fantastic alternative. Just be mindful of the sweetness level; dark chocolate can make the cookies less sweet than expected.
How should I store my Easter Chocolate Chip Cookies?
The best way to keep your cookies fresh is to store them in an airtight container at room temperature for up to 5 days. If you want to keep them longer, try refrigerating them in a sealed container for a week, or freeze them layered between parchment paper for up to 2 months. This will maintain their soft texture!
Can I freeze the decorated cookies?
Yes, you can certainly freeze the decorated cookies! Allow them to cool completely before freezing. Wrap them individually in plastic wrap and place them in an airtight container. This prevents the decorations from getting damaged. To thaw, just leave them at room temperature for about 30 minutes before indulging—no need to rush!
What should I do if my cookies turn out too dry?
Very often, dry cookies can result from too much flour or overbaking. For next time, ensure you’re measuring flour accurately using the spoon-and-level method, and keep an eye on the baking time. Aim for slightly underbaked centers for that perfect chewy texture. If they do come out dry, consider serving them with a scoop of ice cream or dollop of whipped cream to moisten each bite.
Can I make these cookies gluten-free?
Absolutely! You can swap out the all-purpose flour for a gluten-free flour blend. Just be sure to follow any specific instructions provided by the blend you choose, as some may require a binding agent or adjustments. This way, everyone can enjoy these festive Easter Chocolate Chip Cookies without compromise!
Are these cookies safe for pets?
No, chocolate is toxic to pets, particularly dogs. If you have furry friends, it’s best to keep these cookies out of their reach. Always monitor when baking around pets to ensure they don’t sneak a treat!
Easter Chocolate Chip Cookies with Creamy Vanilla Bark Magic
Ingredients
Equipment
Method
- Preheat your oven to 190°C (375°F). Gather your ingredients and line a baking sheet with parchment paper.
- In a large mixing bowl, beat together the softened unsalted butter and granulated sugar until pale and fluffy, approximately 3–4 minutes.
- Add one large egg and pure vanilla extract to the creamed mixture, mixing until combined, about 1–2 minutes.
- In a separate bowl, whisk together the all-purpose flour, baking soda, and fine salt. Gradually incorporate this into the wet ingredients until a uniform dough forms.
- Gently fold in the milk chocolate chips using a spatula.
- Using a tablespoon or cookie scoop, portion out balls of dough on the prepared baking sheet, leaving 2–3 inches apart.
- Bake for 8 to 10 minutes, or until the edges are light golden brown.
- Let the cookies rest on the baking sheet for 1 minute, then transfer them to a wire rack to cool completely.
- Melt the vanilla almond bark in a microwave-safe bowl in 30-second intervals, stirring often.
- Dip the cooled cookies halfway into the melted vanilla bark and top with colorful Easter-themed sprinkles.
- Chill the decorated cookies for about 20 minutes in the refrigerator until the vanilla bark hardens.
Leave a Reply