
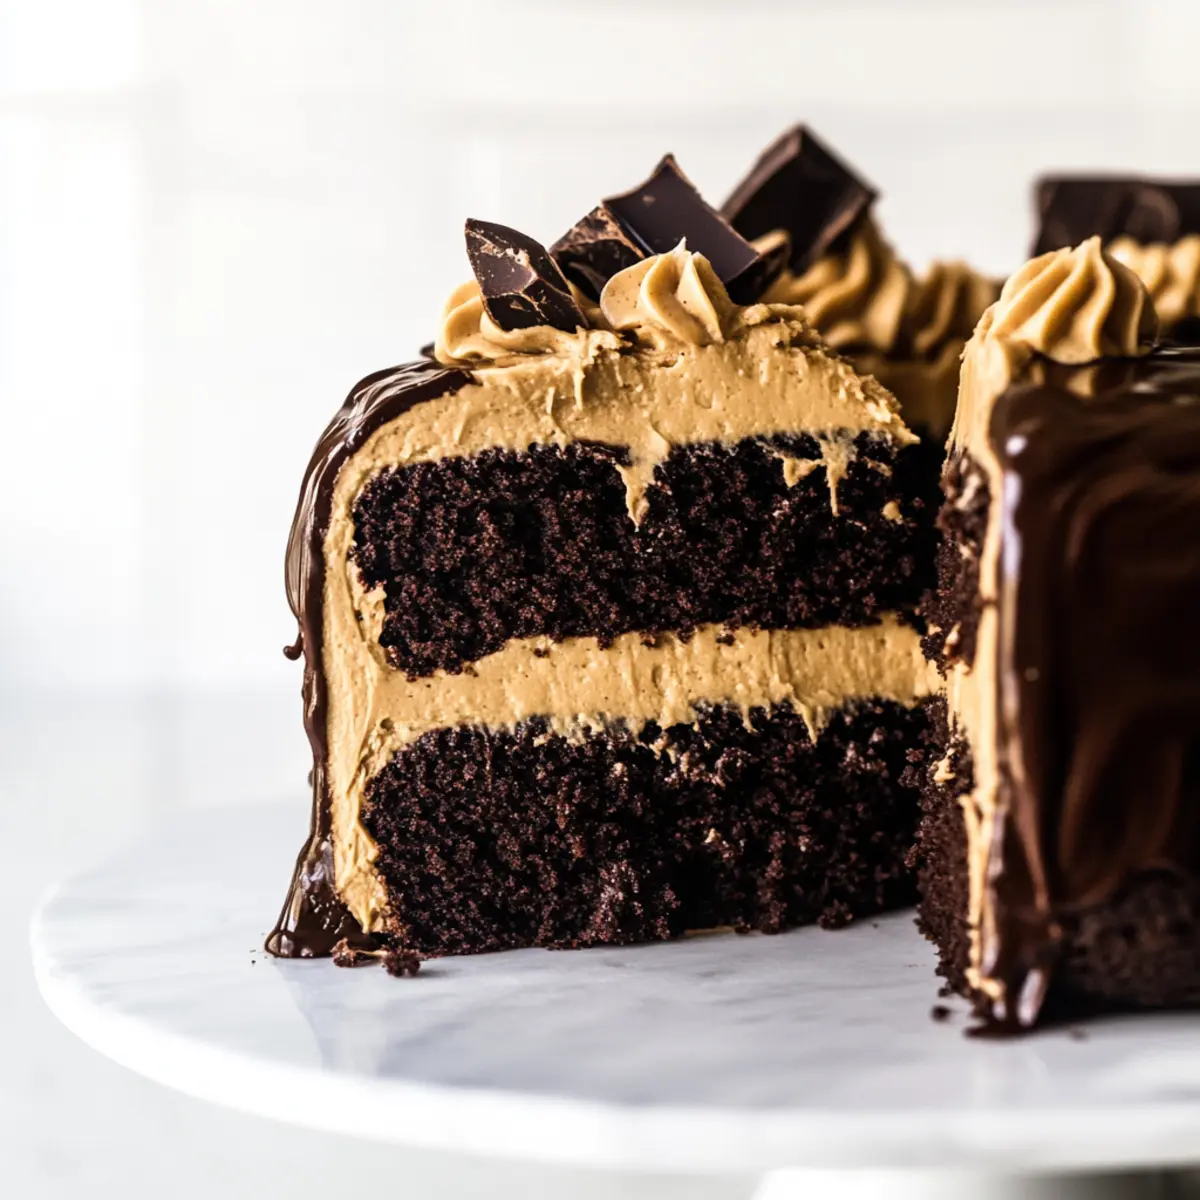
You know that moment when your sweet tooth takes over, and you simply have to indulge? That’s how I felt when I whipped up this Chocolate Brownie Cake with Peanut Butter Frosting. The marriage of rich, fudgy brownie layers and creamy peanut butter frosting creates a delightful experience that is both comforting and satisfying. Not only is this cake a showstopper for special occasions, but it also brings an air of elegance to any weekend baking affair. Plus, it’s a breeze to make, even for budding bakers like us! So, whether you’re celebrating a birthday or just treating yourself, this recipe will surely become a new favorite. Are you ready to dive into chocolaty goodness with a nutty twist?
Why is This Cake So Irresistible?
Decadent Layers: The rich, fudgy brownie layers are incredibly satisfying, creating a delightful foundation for your taste buds.
Creamy Frosting: The luscious peanut butter frosting perfectly complements the chocolate, resulting in a deliciously smooth and creamy experience.
Easy to Make: Don’t worry if you’re a beginner; this recipe is straightforward and user-friendly, making it achievable even for novice bakers.
Customizable Delight: Feel free to personalize it with variations like Mini Dessert Cake or add toppings like chopped peanut butter cups for that extra touch!
Showstopper Appeal: Whether for birthdays or casual gatherings, this cake is sure to impress friends and family alike, becoming a go-to for all occasions.
Perfect Pairing: Serve it with a scoop of vanilla ice cream for a truly indulgent treat that elevates this cake to heavenly levels!
Chocolate Brownie Cake with Peanut Butter Frosting Ingredients
• Here’s what you need to create this delightful treat:
For the Cake
- Unsalted Butter (1 stick / 113 grams) – Adds richness and moisture; substitute with margarine for a dairy-free option.
- Semisweet Baking Chocolate (8 ounces / 227 grams) – Primary source of chocolate flavor; you can use dark chocolate for a richer taste.
- Granulated Sugar (1 cup / 200 grams) – Sweetens the cake; consider using brown sugar for a hint of caramel flavor.
- Dark Brown Sugar (2/3 cup / 133 grams) – Adds moisture and depth; light brown sugar works as a substitute if needed.
- All-Purpose Flour (3/4 cup / 95 grams) – Provides structure; opt for a gluten-free flour blend for celiac-friendly results.
- Unsweetened Natural Cocoa Powder (1 cup / 85 grams) – Enhances the chocolate flavor; Dutch-processed cocoa is an excellent alternative.
- Baking Powder (3/4 teaspoon) – Helps the cake rise; ensure it’s fresh for optimal results.
- Fine Sea Salt (1/2 teaspoon) – Balances sweetness and deepens flavors; regular salt can be substituted.
- Large Eggs (5) – Provide structure and moisture; room temperature eggs integrate best for a fluffier texture.
- Vegetable Oil (1/2 cup) – Keeps the cake moist; melted coconut oil is a tasty replacement.
- Vanilla Extract (1 teaspoon) – Enhances flavor; use pure vanilla for the best outcome.
For the Frosting
- Unsalted Butter (2 sticks / 227 grams) – Provides creaminess in the frosting base.
- Creamy Peanut Butter (1 cup / 270 grams) – The star ingredient; smooth peanut butter creates a luxurious texture.
- Powdered Sugar (2 1/2 cups / 313 grams) – Sweetens the frosting while adjusting its consistency; coconut sugar can be a healthier alternative.
Optional Toppings
- Chopped Peanut Butter Cups – A fun addition for extra flavor and flair; they’ll elevate the chocolate experience!
With these ingredients in hand, you’re all set to create the most delightful Chocolate Brownie Cake with Peanut Butter Frosting you’ve ever tasted!
Step‑by‑Step Instructions for Chocolate Brownie Cake with Peanut Butter Frosting
Step 1: Preheat the Oven
Begin by preheating your oven to 350°F (175°C). While that warms up, prepare three 6-inch cake pans by greasing them and lining the bottoms with parchment paper. This ensures an easy release of the Chocolate Brownie Cake later on and sets the stage for even baking.
Step 2: Melt Chocolate and Butter
In a heat-safe bowl, combine 1 stick of unsalted butter and 8 ounces of semisweet baking chocolate. Place this bowl in the microwave, heating it in 30-second intervals until smooth and fully melted. Stir occasionally for an even consistency, making sure the mixture is glossy and free of lumps before moving on.
Step 3: Mix Sugars
Once the melted chocolate and butter mixture has cooled slightly, whisk in 1 cup of granulated sugar and 2/3 cup of dark brown sugar. Make sure everything is blended well. The mixture will have a slightly shiny appearance and should feel warm but not hot; this will help integrate the eggs more efficiently in the next step.
Step 4: Combine Dry Ingredients
In a separate bowl, mix together 3/4 cup of all-purpose flour, 1 cup of unsweetened cocoa powder, 3/4 teaspoon of baking powder, and 1/2 teaspoon of sea salt. Stir them well to combine all the dry ingredients evenly. This step is crucial for ensuring that the Chocolate Brownie Cake has a light yet fudgy texture.
Step 5: Add Eggs and Oil
Now, it’s time to add the eggs! Whisk in 5 large eggs, one at a time, into your slightly cooled chocolate mixture. After each addition, ensure it’s well incorporated. Next, add 1/2 cup of vegetable oil and 1 teaspoon of vanilla extract, mixing until fully combined. The batter will be rich and glossy at this point.
Step 6: Incorporate Dry Ingredients
Gently fold the combined dry ingredients into the chocolate mixture using a rubber spatula. Be careful not to overmix; stop as soon as you no longer see dry flour or cocoa powder. This preserves the tenderness of the Chocolate Brownie Cake, giving it that lovely gooey texture everyone loves.
Step 7: Bake Layers
Divide the batter evenly between your prepared cake pans. Spread it out to ensure even layers, then place them in the oven. Bake for 25 minutes or until a toothpick inserted into the center comes out clean or with a few moist crumbs attached. The tops should look firm but still slightly soft to the touch.
Step 8: Cool the Cakes
Once baked, remove the pans from the oven and allow the cakes to cool in the pans for about 10 minutes. Then, carefully turn them out onto wire racks to cool completely. This cooling step is essential for avoiding melted frosting later when you assemble the Chocolate Brownie Cake.
Step 9: Prepare Frosting
While the cake layers cool, prepare the frosting by beating together 2 sticks of unsalted butter and 1 cup of creamy peanut butter in a mixing bowl until light and fluffy. Gradually add 2 1/2 cups of powdered sugar, along with a pinch of salt and 1 teaspoon of vanilla extract, mixing until you achieve a creamy and spreadable consistency.
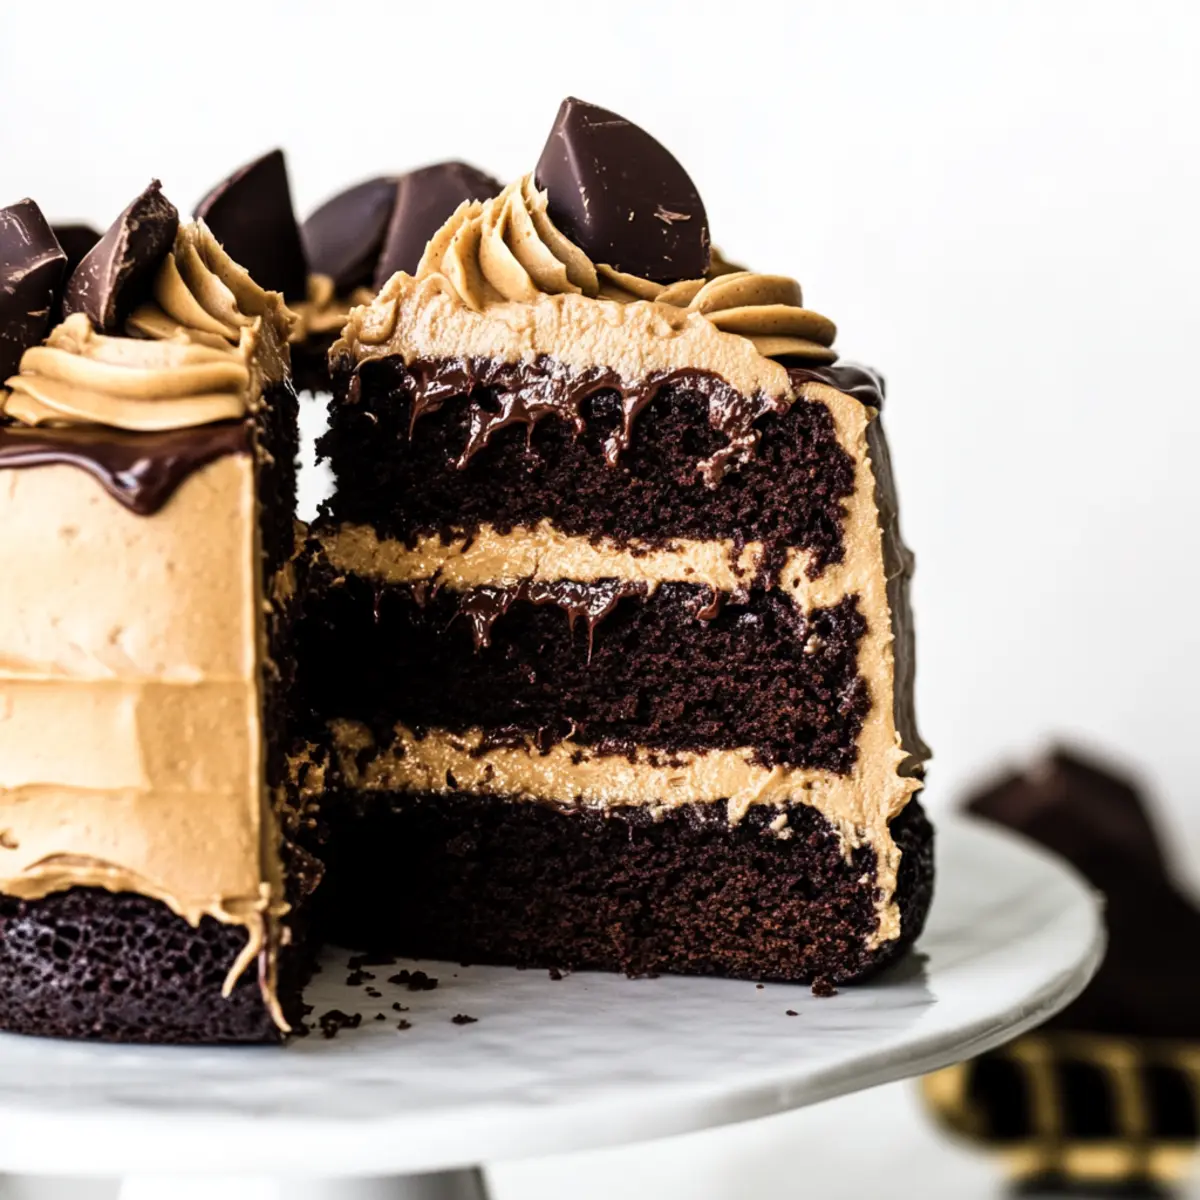
Step 10: Assemble the Cake
Place one layer of chocolate brownie on a serving plate and spread a generous layer of peanut butter frosting on top. Repeat this with the second layer, ensuring a smooth finish. Perform a crumb coat by applying a thin layer of frosting all around the cake to catch any crumbs, then chill for about 15 minutes in the fridge.
Step 11: Make Ganache
Prepare the ganache by melting additional chocolate with heavy cream in a heat-safe bowl. Stir until smooth, allowing it to cool slightly. Once the ganache has thickened enough but is still pourable, drizzle it over the frosted cake, letting it drip elegantly down the sides for a beautiful finish.
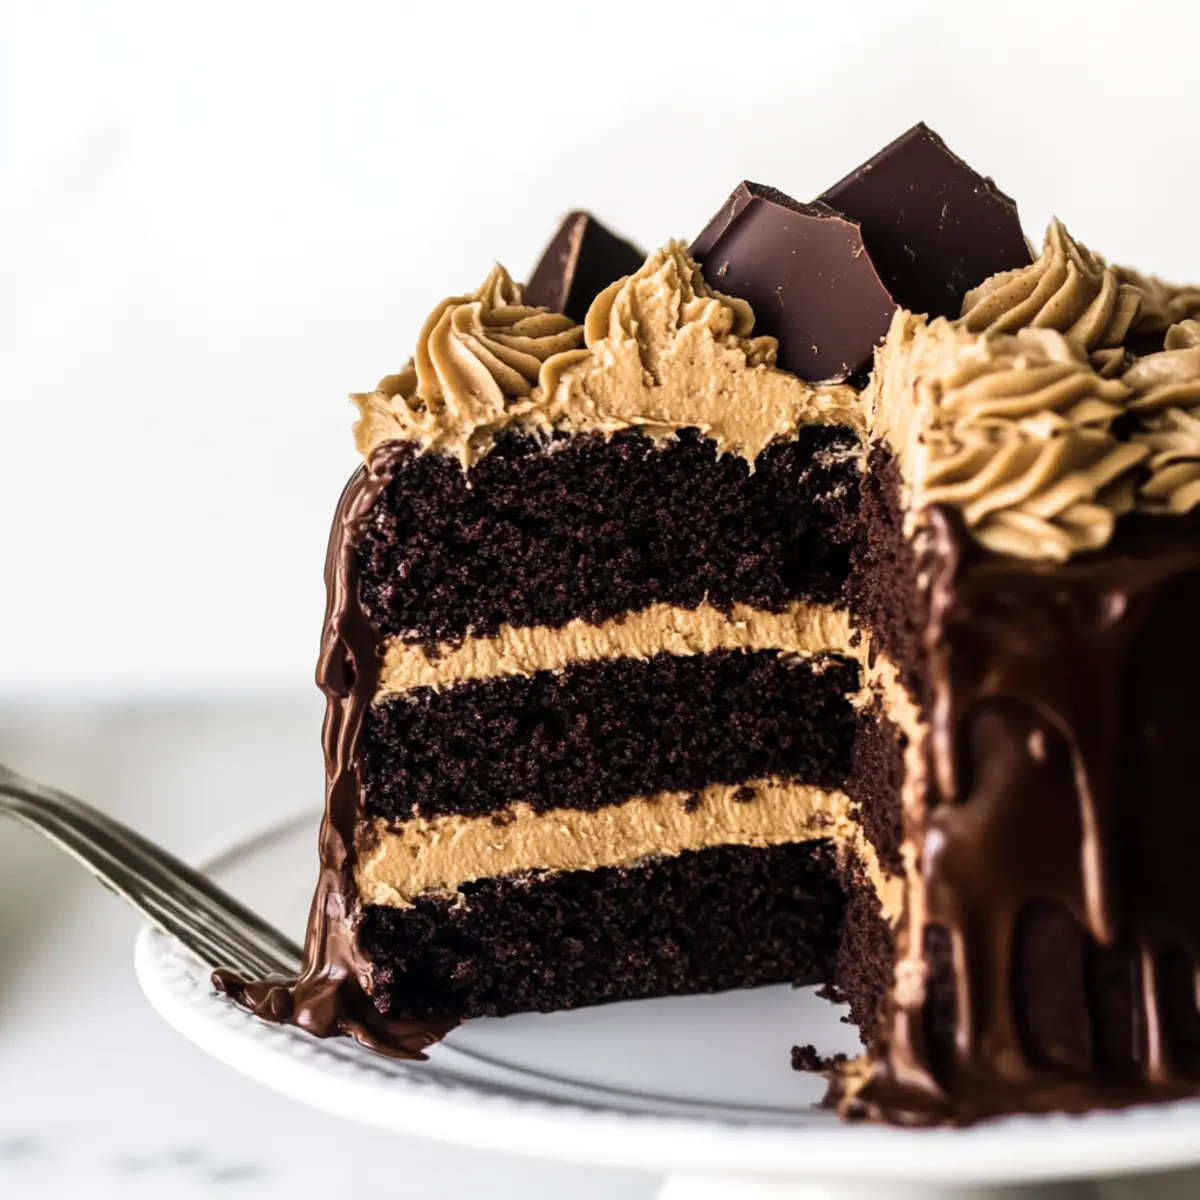
Step 12: Decorate
If desired, sprinkle chopped peanut butter cups on top of the ganache for an extra touch of indulgence. The final presentation of your Chocolate Brownie Cake with Peanut Butter Frosting will be a delightful sight and irresistible to any chocolate lover!
What to Serve with Chocolate Brownie Cake with Peanut Butter Frosting
Elevate your dessert experience by pairing your Chocolate Brownie Cake with delightful sides that enhance its rich flavors and textures.
-
Vanilla Ice Cream: A classic choice, the creamy texture perfectly complements the cake’s dense richness, creating a blissful contrast in every bite.
-
Fresh Berries: Juicy raspberries or strawberries add a bright, tart note that balances the sweetness of the brownie cake and refreshes the palate.
-
Whipped Cream: Light and airy, a dollop of whipped cream offers a nice counterpoint to the cake’s fudgy texture, inviting a delightful mix of flavors.
-
Espresso: A shot of espresso or a cup of coffee enhances chocolate’s richness, creating a comforting combination that warms the heart.
-
Peanut Butter Cup Nibbles: For the peanut butter lover, serve with a side of peanut butter cups. This echoes the frosting flavor while adding fun and crunch.
-
Chocolate Ganache Drizzle: Pouring warm chocolate ganache on the side invites even more indulgence, making each slice a chocolate lover’s dream come true!
Make Ahead Options
These Chocolate Brownie Cake with Peanut Butter Frosting layers are perfect for busy home cooks looking to save time! You can bake the brownie layers up to 2 days in advance and store them in an airtight container in the fridge, or freeze them for up to 3 months. To maintain their fudgy texture, ensure they are completely cooled before wrapping tightly in plastic wrap. The peanut butter frosting can be prepared in advance and stored in the fridge for up to 3 days; just give it a quick whisk before spreading. When you’re ready to serve, simply assemble the cake, frost it, and finish with the ganache for a delightful treat that’s just as delicious as when freshly made!
Chocolate Brownie Cake with Peanut Butter Frosting Variations
Feel free to explore your creativity and personalize your delicious cake with these delightful variations!
-
Dairy-Free: Substitute unsalted butter with coconut oil and use dairy-free chocolate for a vegan-friendly delight.
-
Nut-Free: Swap out peanut butter for sunflower seed butter or tahini to keep the nutty goodness while accommodating allergies.
-
Flavor Boost: Add espresso powder to the brownie batter for a rich, coffee-enhanced chocolate flavor that instantly elevates your cake.
Embrace the warmth of chocolate with a dash of coffee magic; it’s an unexpected twist that will leave your friends asking for more!
-
Gluten-Free: Use a 1:1 gluten-free flour blend to make the cake accessible for those avoiding gluten without compromising on flavor.
-
Caramel Drizzle: Top your frosted cake with a drizzle of salted caramel sauce for an extra layer of indulgence that balances the chocolate and peanut butter.
-
Chunky Texture: Fold in chopped nuts, like walnuts or pecans, into the brownie batter for a delightful crunch amidst the fudginess.
-
Spicy Heat: Sprinkle some cayenne pepper into the frosting for a surprising kick that pairs surprisingly well with chocolate and peanut butter.
-
Mix & Match Frosting: Try using different nut butters, like almond butter or cashew butter, for a unique flavor twist that keeps every slice exciting.
Consider pairing your Chocolate Brownie Cake with unforgettable desserts like Red Velvet Cake or indulge in a little treat like Hostess Snowball Cake! Any of these additions will enhance your chocolate journey into delectable bliss!
Expert Tips for Chocolate Brownie Cake with Peanut Butter Frosting
-
Room Temperature Eggs: Ensure your eggs are at room temperature for better incorporation, preventing any lumps in your batter for the perfect Chocolate Brownie Cake.
-
Cool Before Frosting: Allow the brownie layers to cool completely before frosting. This helps prevent the peanut butter frosting from melting and maintains its creamy texture.
-
Avoid Overmixing: When combining the dry ingredients with the wet mixture, be careful not to overmix. This keeps your Chocolate Brownie Cake dense and fudgy, just like it should be!
-
Adjust Frosting Consistency: For a thicker frosting, add more powdered sugar; for a thinner consistency, simply add a splash of cream. This way, you can customize the frosting to your liking!
-
Chill the Cake: After applying the crumb coat, chill the assembled cake for about 15 minutes before adding the final layer of frosting. This makes it easier to work with and gives it a professional look.
How to Store and Freeze Chocolate Brownie Cake with Peanut Butter Frosting
Fridge: Store the cake in an airtight container in the fridge for up to 3 days. This keeps your delicious Chocolate Brownie Cake fresh and prevents it from drying out.
Room Temperature: If you plan to enjoy it within a day, you can keep the cake covered at room temperature for up to 1 day. Just remember to keep it away from direct sunlight or heat.
Freezer: For longer storage, freeze the unassembled brownie layers wrapped tightly in plastic wrap and aluminum foil for up to 3 months. Thaw in the fridge before assembling with frosting.
Reheating: To enjoy cake warm, microwave a slice for 10-15 seconds or let it sit at room temperature for about an hour. This brings back the fudginess of your Chocolate Brownie Cake!
Chocolate Brownie Cake with Peanut Butter Frosting Recipe FAQs
How do I select the best chocolate for this recipe?
When choosing chocolate, go for high-quality semisweet chocolate that has a rich flavor. Look for bars with a cocoa percentage around 60-70% for the best depth of taste. If you prefer a deeper chocolate flavor, dark chocolate is an excellent alternative. Make sure to check the ingredients; avoid any with unnecessary fillers or additives.
How should I store my Chocolate Brownie Cake with Peanut Butter Frosting?
Store your cake in an airtight container in the fridge for up to 3 days to keep it fresh and moist. If you’re planning to enjoy it within a day, it can remain covered at room temperature for up to 1 day but keep it away from direct sunlight. This way, you get to savor its deliciousness without compromise!
Can I freeze the Chocolate Brownie Cake layers?
Absolutely! To freeze your brownie layers, allow them to cool completely. Wrap each layer tightly in plastic wrap, followed by aluminum foil, and place them in the freezer for up to 3 months. When you’re ready to enjoy, simply thaw them in the fridge overnight, and then assemble with the frosting when they’re soft but still chilled.
What if my frosting is too thick or too thin?
If your frosting is too thick, add a splash of heavy cream or milk to thin it out gradually, mixing until you achieve your desired consistency. Conversely, if your frosting is too thin, you can add more powdered sugar, a tablespoon at a time, until it thickens up nicely. Adjusting the consistency can make a world of difference in how beautiful and easy it is to spread!
Is there a way to make this recipe healthier?
You can lighten up the frosting by substituting part of the butter with Greek yogurt, which gives you a creamy texture while reducing calories and fat. Additionally, using coconut sugar instead of powdered sugar can offer a more natural sweetness. If allergies are a concern, be sure to check for nut-free alternatives if you’re using almond butter or other nut-based toppings.
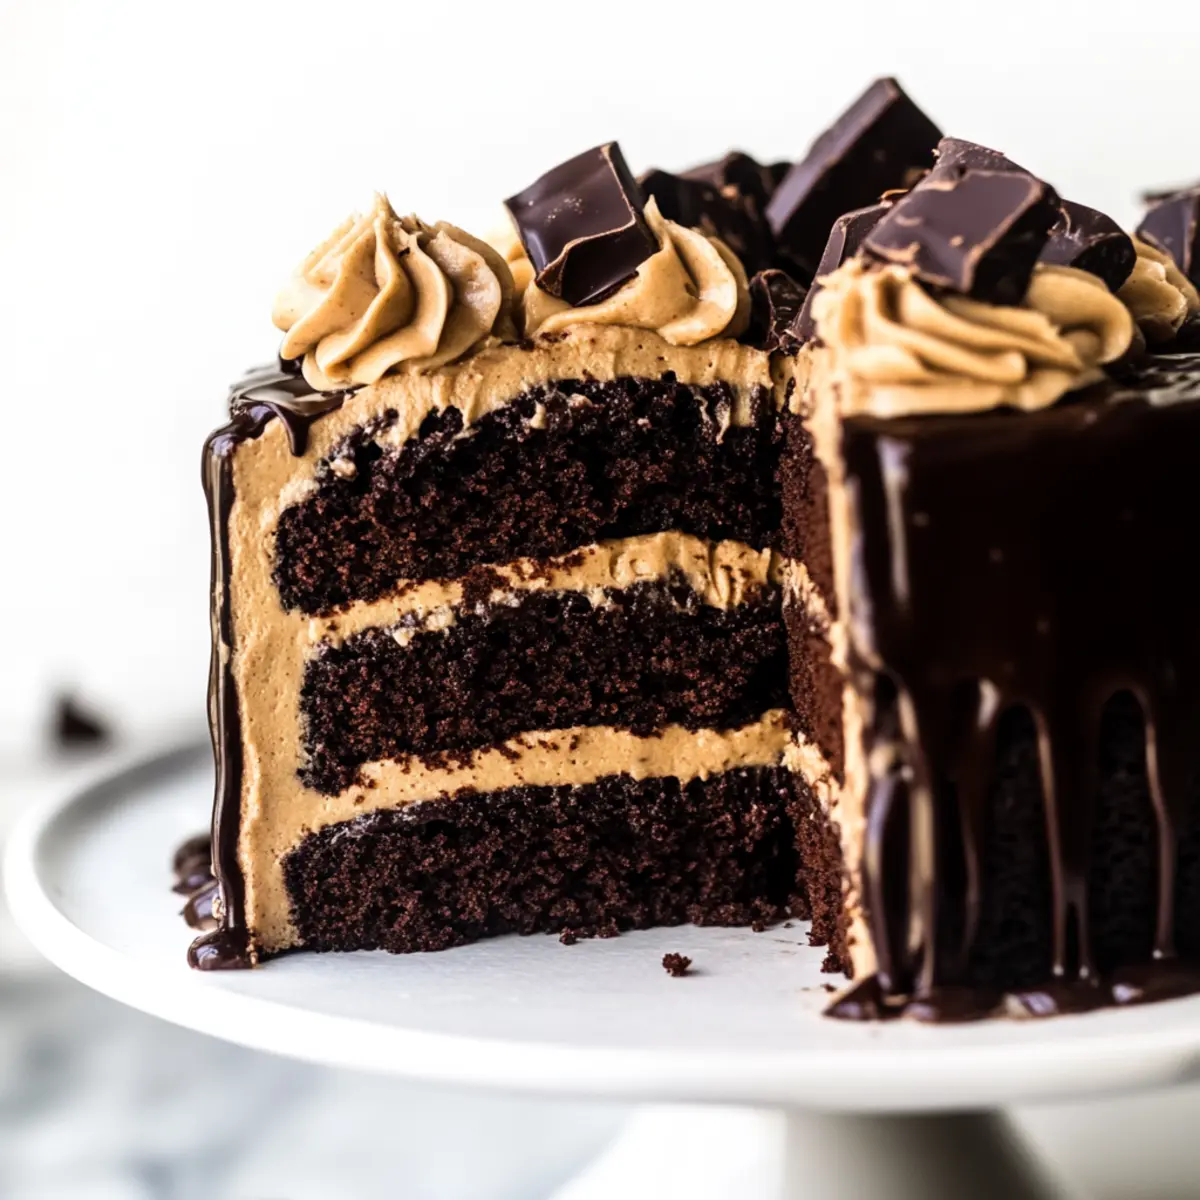
Irresistible Chocolate Brownie Cake with Peanut Butter Frosting
Ingredients
Equipment
Method
- Preheat your oven to 350°F (175°C). Prepare three 6-inch cake pans by greasing and lining the bottoms with parchment paper.
- In a heat-safe bowl, combine unsalted butter and semisweet baking chocolate. Melt in the microwave in 30-second intervals, stirring until smooth.
- Whisk in granulated sugar and dark brown sugar until blended, mixture will be warm but not hot.
- In another bowl, mix all-purpose flour, cocoa powder, baking powder, and salt. Combine these dry ingredients evenly.
- Whisk in the eggs one at a time into the chocolate mixture, then add vegetable oil and vanilla extract, mixing well.
- Gently fold the dry ingredients into the chocolate mixture until just combined, avoiding overmixing.
- Divide the batter evenly among your prepared cake pans, spreading it out evenly. Bake for 25 minutes.
- Remove from the oven and cool in the pans for 10 minutes, then turn onto wire racks to cool completely.
- Beat together unsalted butter and peanut butter until fluffy. Gradually add powdered sugar and mix until creamy.
- Assemble the cake by placing one layer on a plate and spreading frosting on top. Repeat with the second layer and chill for 15 minutes.
- Prepare ganache by melting more chocolate with cream, stir until smooth and drizzle over frosted cake.
- Optionally, sprinkle chopped peanut butter cups on top for additional decoration and flavor.
Leave a Reply