
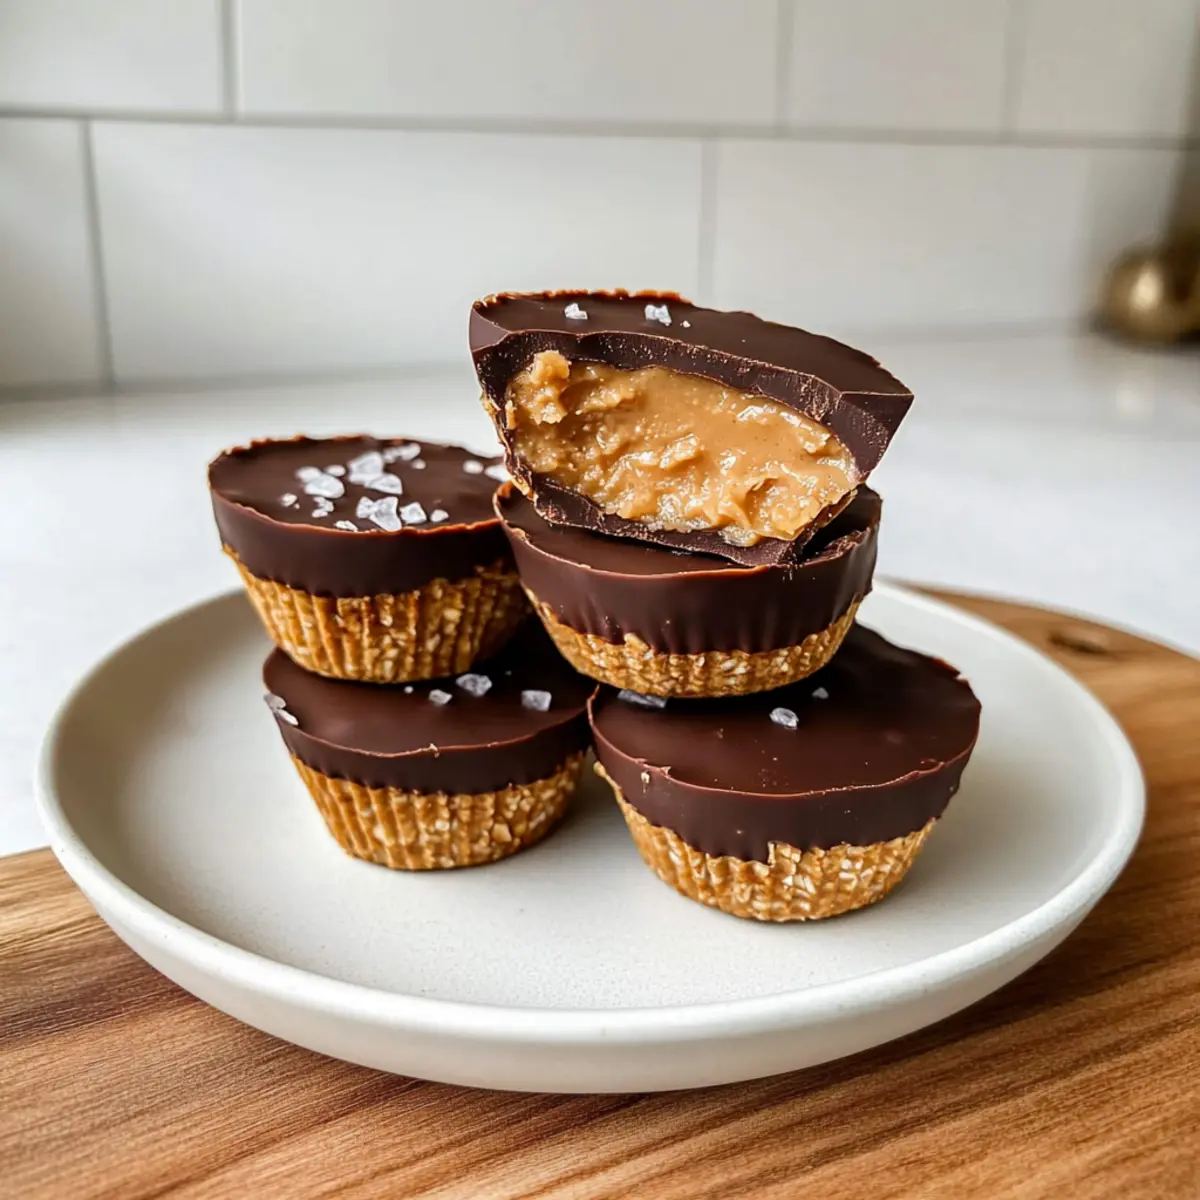
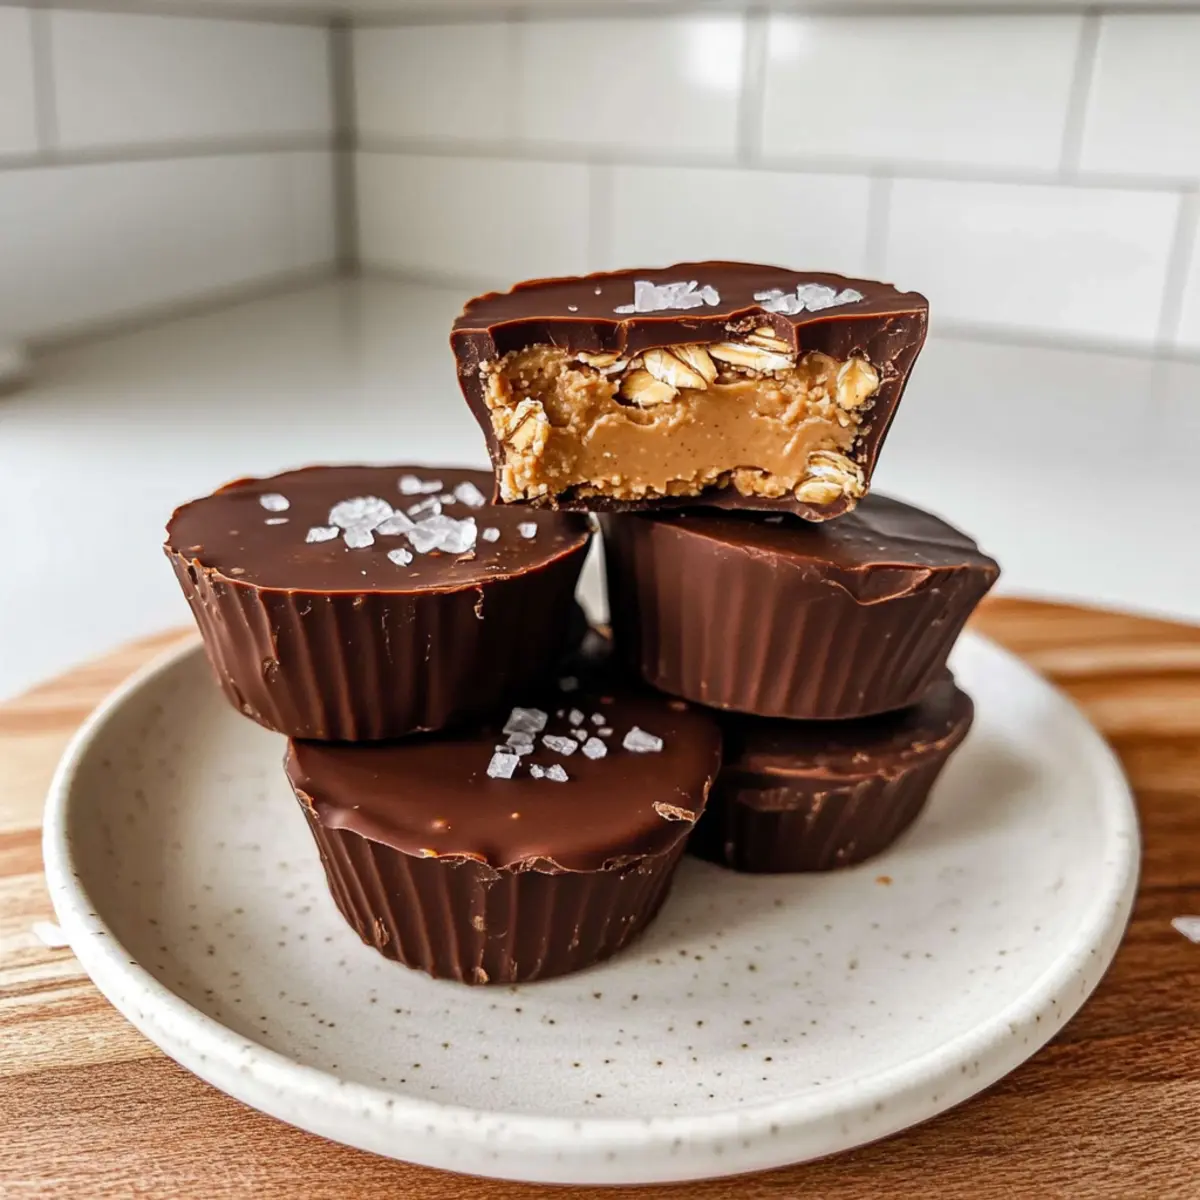
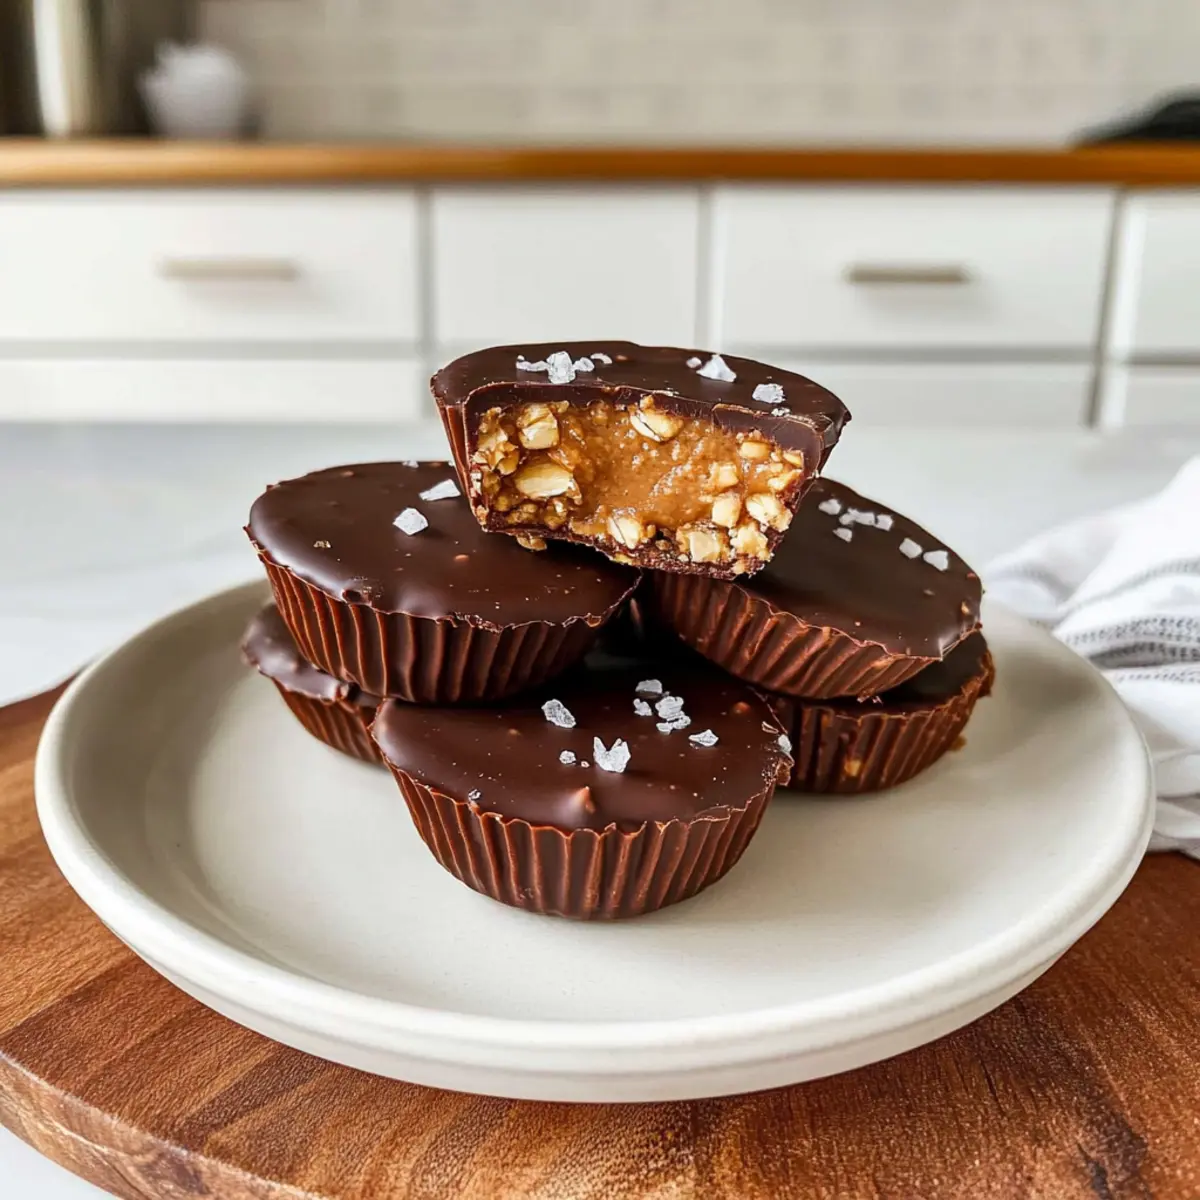
Have you ever found yourself rummaging through the pantry, searching for something fun and rewarding to whip up? That’s exactly how these Quick No-Bake Peanut Butter Oat Cups came to life! With a delightful blend of chewy oats and creamy peanut butter, they offer a satisfying hug in every bite—perfect for anyone who craves something homemade without the hassle. What I love most about this recipe is how effortlessly it fits into my busy days; it comes together in under 20 minutes and caters to various dietary needs, from gluten-free to vegan. Plus, you can easily customize the ingredients to suit your taste. With a sweet maple syrup touch and a drizzle of chocolate, how can you resist? So, are you ready to bring a little joy into your kitchen?
Why are Peanut Butter Oat Cups a must-try?
Irresistible Flavor: The combination of creamy peanut butter, chewy oats, and sweet chocolate will have your taste buds dancing.
Quick to Assemble: You can whip these up in under 20 minutes, making this a lifesaver for busy days or last-minute cravings.
Diet-Friendly: These cups cater to various dietary needs—perfect for gluten-free and vegan diets!
Endless Customization: Switch out peanut butter for sunbutter, or add nuts for a delightful crunch.
Guilt-Free Indulgence: Relish a healthy dessert that feels decadent but is made with wholesome ingredients.
For more quick treat ideas, check out Mini Dessert Cups or explore other versions like our Garlic Butter Lemon for savory bites!
Peanut Butter Oat Cups Ingredients
• Perfect for a quick and healthy treat!
For the Base
- Peanut Butter – Provides richness and binding; substitute with any nut or seed butter for a nut-free option.
- Old Fashioned Rolled Oats – Adds texture and chewiness; certified gluten-free oats can be used for gluten-free versions.
- Maple Syrup – Adds natural sweetness; honey, agave, or date syrup can work as alternatives.
- Dollop of Peanut Butter – Used as a filling layer on top for extra creamy goodness.
- Protein Powder – Enhances nutritional value; can skip or use a plant-based protein for added benefits.
For the Topping
- Chocolate Chips – Melted for a rich chocolate drizzle on top; vegan chocolate can be used for dairy-free versions.
- Flaky Sea Salt – Optional topping for a delightful flavor contrast that elevates the sweetness.
Step‑by‑Step Instructions for Peanut Butter Oat Cups
Step 1: Mix Peanut Butter and Maple Syrup
In a large mixing bowl, combine the creamy peanut butter and maple syrup. Use a spatula to mix vigorously until the mixture becomes smooth and well-blended, which should take about 2–3 minutes. The goal is to achieve a creamy consistency that will hold the oats together, providing a deliciously rich base for your Peanut Butter Oat Cups.
Step 2: Incorporate the Rolled Oats
Next, add the old-fashioned rolled oats to the peanut butter mixture. Stir gently but thoroughly until all oats are coated and evenly incorporated, which should take another 2–3 minutes. The mixture will start to resemble a thick dough, so ensure that there are no dry oats remaining before proceeding to the next step.
Step 3: Shape the Oat Cups
Grab a silicone mold and, using a spoon, scoop about 2 tablespoons of the oat mixture into each cavity. Press the mixture firmly into the molds, creating even cups that are well-formed without any gaps. Aim for a height of about 1 inch for delightful chewy Peanut Butter Oat Cups as you pack the mixture in, ensuring it holds its shape once set.
Step 4: Add a Dollop of Peanut Butter
Once you’ve formed the oat cups, take additional peanut butter and add a dollop on top of each one. If using protein powder, mix it into the dollop of peanut butter before spreading it on the oat cups for an extra boost. This layer will add richness and make for a delightful surprise in every bite!
Step 5: Freeze to Set
Place the filled molds in the freezer and allow them to set for about 20 minutes. This chilling time ensures that the Peanut Butter Oat Cups firm up nicely, making them easy to remove from the molds later. You’ll know they are ready when they feel solid to the touch and hold their shape well.
Step 6: Melt the Chocolate
While waiting for the cups to set, melt the chocolate chips with a teaspoon of vegetable oil in a microwave-safe bowl. Heat the mixture in 30-second intervals, stirring between each session until completely smooth and melted, which should take around 1-2 minutes. Be careful to avoid overheating the chocolate to prevent it from seizing.
Step 7: Drizzle Chocolate Over Cups
Remove the oat cups from the freezer and carefully pour or drizzle the melted chocolate over each cup using a spoon or a piping bag for precision. Ensure even coverage, allowing the chocolate to accentuate the creamy texture of the Peanut Butter Oat Cups. If desired, sprinkle a pinch of flaky sea salt on top for a savory contrast.
Step 8: Final Freeze
Return the drizzled cups to the freezer for another 20 minutes, allowing the chocolate layer to harden completely. This final setting ensures that your Peanut Butter Oat Cups are the perfect combination of chewy oats, creamy peanut butter, and rich chocolate when served.
Step 9: Serve and Enjoy
Once the chocolate has set, gently remove the Peanut Butter Oat Cups from the silicone molds. You may need to flex the molds slightly to pop them out easily. These delightful treats are now ready to be devoured, either as a quick snack or a healthy dessert option.
Peanut Butter Oat Cups Variations
Feel free to let your creativity shine by customizing your Peanut Butter Oat Cups with these delightful twists!
-
Nut-Free: Swap peanut butter for sunbutter to create a delicious nut-free version without sacrificing taste.
This is a fantastic option for school lunches or gatherings where allergies are a concern. -
Gluten-Free: Use certified gluten-free oats to keep these treats safe for your gluten-sensitive friends.
They won’t miss a beat with the same delicious chewy texture! -
Vegan: Choose agave or maple syrup instead of honey to maintain a fully vegan treat.
With the right swaps, everyone can enjoy this guilt-free dessert together. -
Protein Boost: Mix in flavored protein powder like chocolate or vanilla for an enhanced nutritional profile.
It transforms your treat into a satisfying pre- or post-workout snack that tastes indulgent! -
Chocolate Delight: Use dark chocolate chips or chunks for a rich twist on the classic topping.
This slight change elevates the overall flavor and adds a touch of sophistication. -
Crunch Factor: Add chopped nuts or seeds like almonds or pumpkin seeds for added texture.
This brings a delightful crunch that makes each bite exciting and deliciously addictive! -
Fruity Twists: Fold in some dried fruits like cranberries or raisins for an unexpected sweet surprise.
These little bursts of flavor take your oat cups to another level of yummy! -
Spiced Up: Sprinkle in a dash of cinnamon or nutmeg to the oat mixture for warm, cozy notes.
It adds a comforting aroma, perfect for snuggling up with your snacks on cool evenings.
Remember, experimenting can lead to exciting new flavors! For more indulgent ideas, check out Butter Poached Lobster or create your savory versions with our Herb Butter Salmon recipe!
What to Serve with Quick No-Bake Peanut Butter Oat Cups
Treat yourself to a delightful experience by pairing your homemade oat cups with delicious accompaniments that enhance their creamy, nutty flavor!
- Fresh Fruit: The natural sweetness and juiciness of fruits like strawberries or bananas offer a refreshing contrast, making each bite a burst of flavor.
- Yogurt Parfait: Layer creamy yogurt with granola and berries to create a balanced, satisfying dish that complements the oat cups perfectly.
- Nutty Granola: A sprinkle of crunchy granola adds satisfying texture and enhances the hearty flavors while keeping the theme healthy.
- Herbal Tea: Enjoy a warm cup of chamomile or peppermint tea to elevate your snack time, providing soothing notes that harmonize with the richness of the oat cups.
- Chocolate-Covered Almonds: Indulge in chocolate-covered almonds for a delightful crunch that echoes the oat cups’ crunchy chocolate topping. The nutty flavors pair beautifully!
- Dark Chocolate Drizzle: For an extra layer of decadence, drizzling melted dark chocolate over fruits or yogurt brings an irresistible chocolatey richness alongside your cups.
- Smoothie Bowl: Blend your favorite fruits with almond milk and top with sliced fruits or nuts. It’s a vibrant dish that plays well with the rich peanut butter flavors.
- Coffee: A warm cup of coffee or iced latte brings out the creamy essence of the peanut butter and chocolate, creating a cozy treat experience!
Expert Tips for Peanut Butter Oat Cups
-
Mix Thoroughly: Ensure the peanut butter and maple syrup are well mixed before adding oats. A good blend helps bind the ingredients better.
-
Use Silicone Molds: Opt for silicone molds for easy removal of the Peanut Butter Oat Cups. They prevent sticking and allow for a smooth release.
-
Mind the Freezing Time: If using creamy peanut butter, it may require longer freezing time to firm up properly. Check before removing from molds.
-
Slowly Melt Chocolate: Melt chocolate chips in short intervals to avoid seizing. Stir frequently and keep a close watch to retain the creamy texture.
-
Customize Flavor: Feel free to switch ingredients! You can add nuts, seeds, or different flavored protein powder to enhance your Peanut Butter Oat Cups.
Make Ahead Options
These Peanut Butter Oat Cups are a perfect candidate for meal prep! You can mix the peanut butter and maple syrup, then incorporate the oats up to 24 hours in advance; simply refrigerate the mixture in an airtight container to maintain freshness. For added convenience, form the oat cups in silicone molds and freeze them until solid, which allows you to store them for up to 3 months. When you’re ready to enjoy, simply melt the chocolate, drizzle it over the cups, and freeze again for another 20 minutes to set. With these make-ahead options, you’ll have delicious, healthy treats available at a moment’s notice, making your week a little easier!
How to Store and Freeze Peanut Butter Oat Cups
-
Room Temperature: Store at room temperature for up to 1 day in an airtight container, keeping the texture soft for immediate enjoyment.
-
Fridge: Keep your Peanut Butter Oat Cups in an airtight container in the refrigerator for up to 1 week. This will maintain their soft, chewy texture.
-
Freezer: For longer storage, freeze the oat cups in a single layer for up to 3 months. Wrap each cup individually in plastic wrap to avoid freezer burn.
-
Reheating: When ready to eat, thaw in the fridge overnight or let sit at room temperature for about 15 minutes. Enjoy these treats slightly chilled or at room temperature!
Peanut Butter Oat Cups Recipe FAQs
How do I choose ripe ingredients for my Peanut Butter Oat Cups?
Absolutely! For the best flavor, ensure your peanut butter is fresh and creamy—look for a product without added sugars or oils. Oats should be whole and not stale; check for any off-putting smells or bugs in the container. If you’re using fresh fruit as a topping, select ripe bananas or seasonal berries that are bright and slightly firm for a deliciously sweet bite.
How should I store my Peanut Butter Oat Cups?
Very good question! To keep your Peanut Butter Oat Cups fresh, store them in an airtight container. If you prefer a soft texture, keep them in the fridge for up to 1 week. For firmer cups, freeze them for up to 3 months. Just wrap each cup individually in plastic wrap to avoid freezer burn, and when you’re ready to enjoy, let them thaw at room temperature for about 15 minutes.
Can I freeze Peanut Butter Oat Cups? What’s the best way?
Of course! Freezing is a fantastic option for these treats. To freeze, first place the unwrapped cups in a single layer on a baking sheet and freeze for about 30 minutes until firm. Then, wrap each cup individually in plastic wrap and store them in a freezer bag or container. This way, they maintain their shape and can be enjoyed later without losing flavor. They’ll last for up to 3 months!
What if my Peanut Butter Oat Cups don’t set properly?
No worries! If your oat cups remain soft and don’t set well, the most likely culprit is not enough freezing time, which can happen if you used creamy peanut butter. If you find them too soft after the suggested freezing time, pop them back into the freezer for an additional 10-15 minutes. Alternatively, you can try placing them in the refrigerator overnight, as the cold will help them firm up.
Are there any dietary considerations for my Peanut Butter Oat Cups?
Definitely! These Peanut Butter Oat Cups can cater to various dietary requirements. To make them vegan, ensure to use maple syrup instead of honey and select dairy-free chocolate chips. For those with nut allergies, substituting peanut butter with sunbutter or another seed butter is a great option. Always double-check ingredient labels to ensure they align with any specific allergies or dietary needs!

Irresistible Peanut Butter Oat Cups for a Quick Healthy Treat
Ingredients
Equipment
Method
- In a large mixing bowl, combine the creamy peanut butter and maple syrup and mix vigorously until smooth and well-blended, around 2-3 minutes.
- Add the old-fashioned rolled oats to the mixture and stir gently until all oats are coated, around 2-3 minutes.
- Scoop about 2 tablespoons of the oat mixture into each cavity of a silicone mold and press firmly to form well-shaped cups.
- Add a dollop of additional peanut butter on top of each cup.
- Place the filled molds in the freezer and allow them to set for about 20 minutes.
- Melt the chocolate chips with a teaspoon of vegetable oil in a microwave-safe bowl, heating in short intervals until smooth.
- Drizzle the melted chocolate over each cup and sprinkle with flaky sea salt if desired.
- Return the drizzled cups to the freezer for another 20 minutes to harden the chocolate.
- Gently remove the cups from the molds and serve.
Leave a Reply