
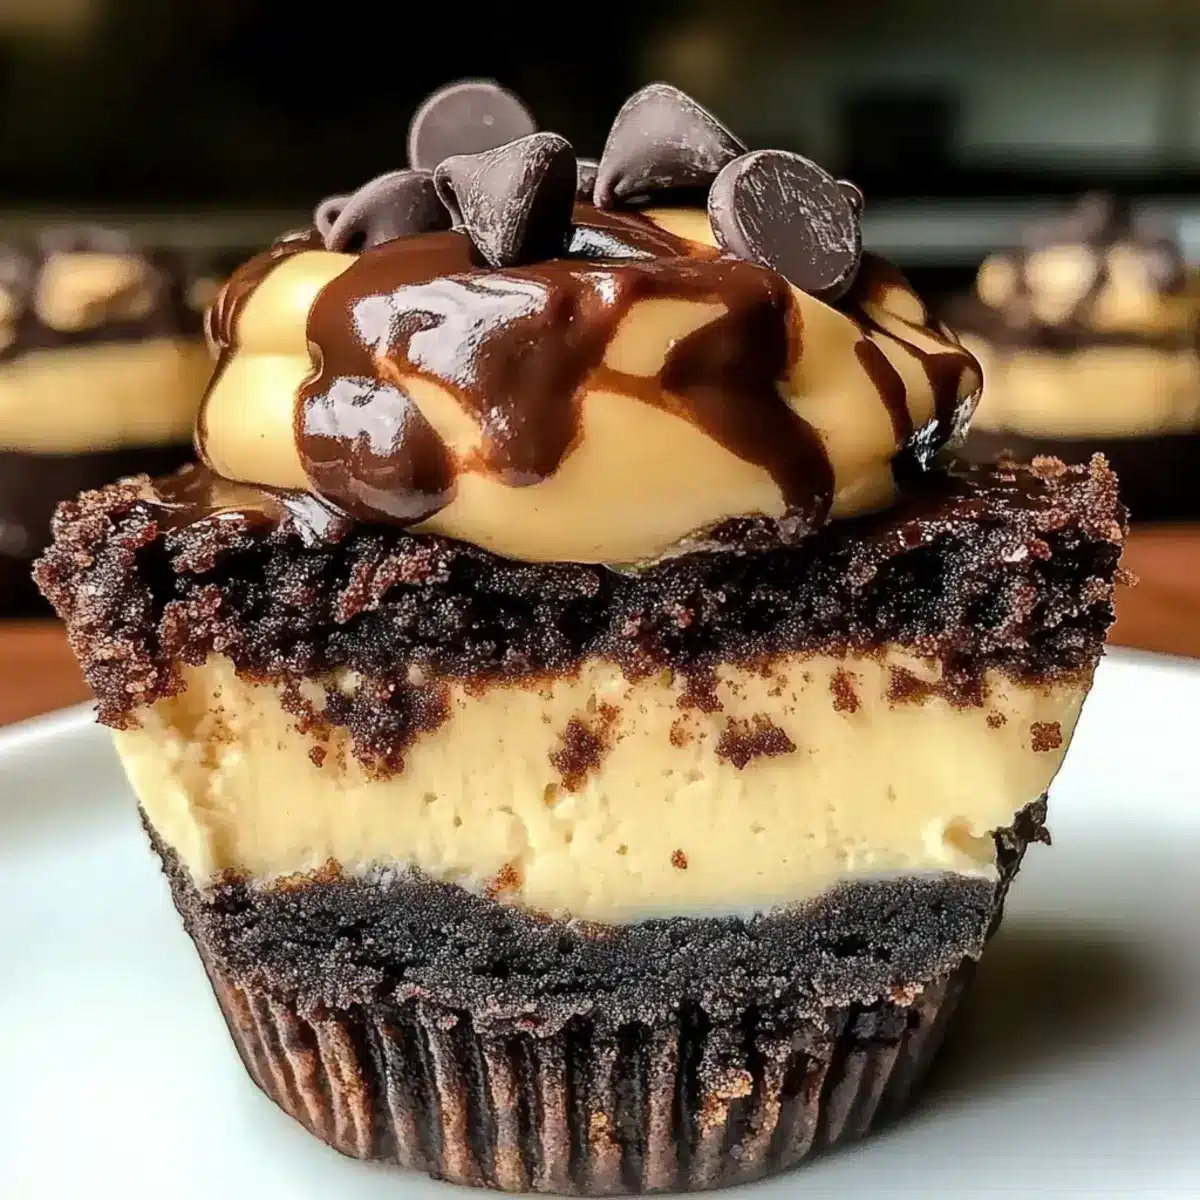
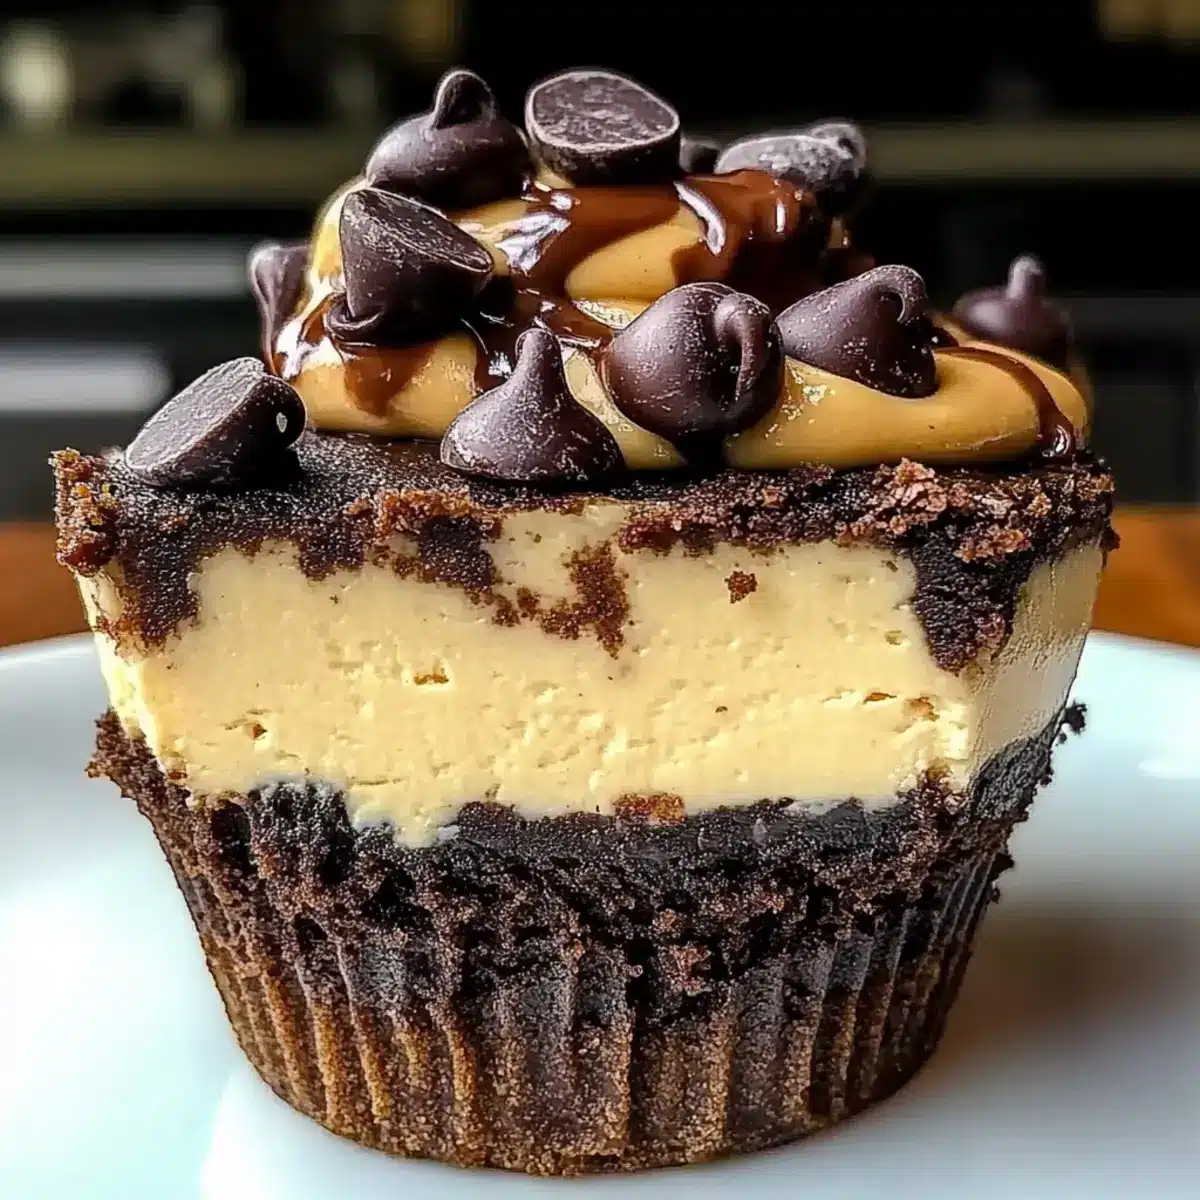
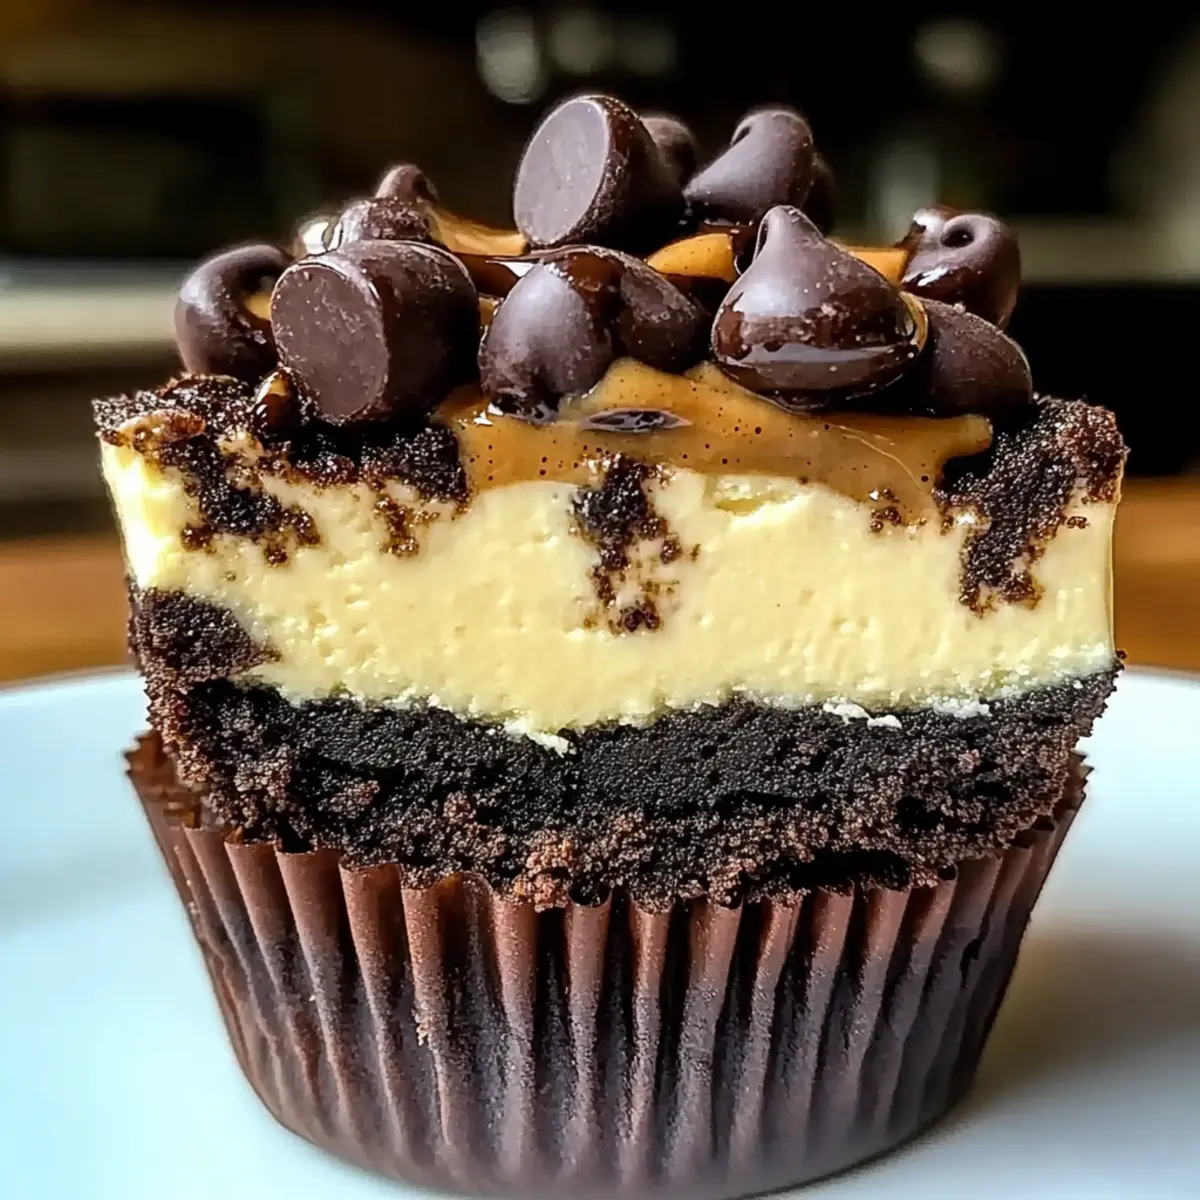
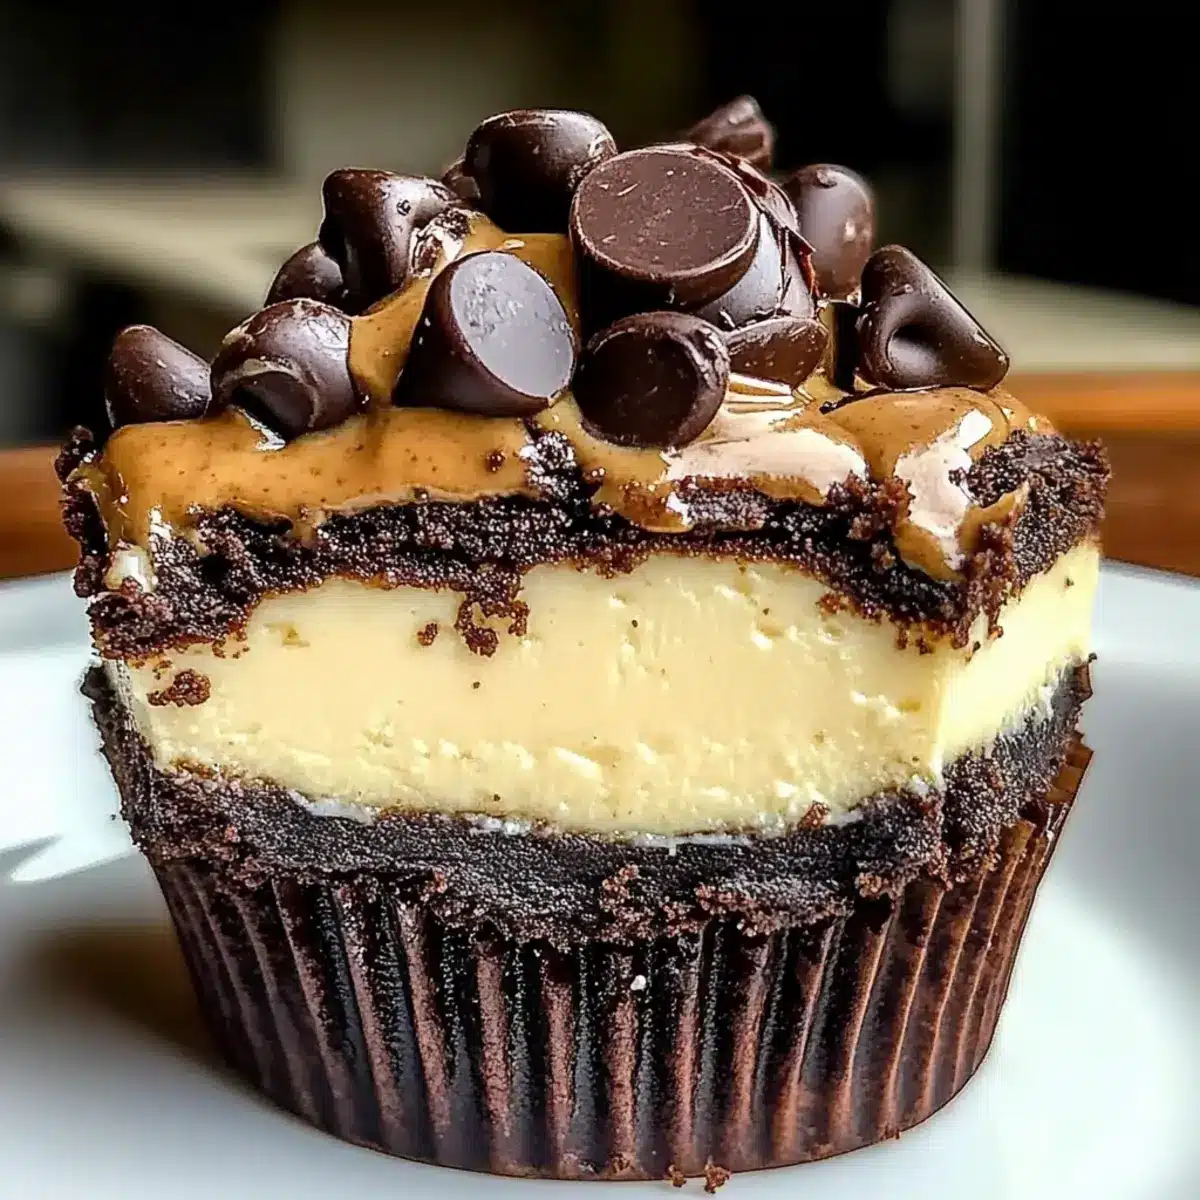
The irresistible aroma of chocolate wafting from the kitchen is a moment that brings everyone together. Today, I’m thrilled to share a delightful recipe for Loaded Brownie Cheesecake Cups that perfectly marries indulgence with convenience. These delightful treats not only boast a fudgy brownie base topped with creamy cheesecake but also allow for endless creative variations — think Peanut Butter Swirl or refreshing Mint Chocolate! What’s more, they’re make-ahead friendly, so you can impress your friends at gatherings without the last-minute rush. If you’re looking for a delectable dessert that satisfies both your sweet tooth and your desire for homemade goodness, these Loaded Brownie Cheesecake Cups are calling your name. Ready to discover how to elevate your dessert game? Let’s dive in!
Why are these cheesecake cups irresistible?
Decadent flavors: Loaded Brownie Cheesecake Cups combine fudgy chocolate and creamy cheesecake, creating a heavenly treat that leaves you wanting more.
Versatile options: With variations like Peanut Butter Swirl or Mint Chocolate, you can customize these cups to suit your taste preferences or seasonal moods.
Make-ahead convenience: Perfect for busy schedules, prepare these in advance and store them in the fridge or freezer, ready to impress your guests whenever you need.
Crowd-pleaser: Whether for parties, potlucks, or family gatherings, these cups are designed to satisfy every chocolate lover’s cravings. For more treat inspiration, check out our Mini Dessert Cups or Strawberry Crunch Cheesecake!
Easy preparation: The straightforward instructions ensure anyone, regardless of baking skill, can whip up these delightful cheesecake cups with ease.
Loaded Brownie Cheesecake Cups Ingredients
• For the Brownie Base
- Melted Butter – Adds richness and moisture to the brownie base; for a dairy-free option, substitute with coconut oil.
- Granulated Sugar (Brownies) – Provides sweetness to perfectly balance the cocoa flavor.
- Eggs – Binds the mixture and provides structure; use room temperature for better emulsification.
- Vanilla Extract – Enhances overall flavor; opt for pure vanilla extract for superior taste.
- Cocoa Powder – Imparts a deep chocolate flavor; always choose high-quality cocoa for the best results.
- All-Purpose Flour – Provides structure; a 1:1 gluten-free flour blend can be used for a gluten-free version.
- Salt – Balances sweetness and enhances flavor.
- Mini Chocolate Chips – Adds bursts of chocolate; highly recommended for a richer experience.
• For the Cheesecake Layer
- Cream Cheese – The base of the cheesecake layer that adds creaminess; use full-fat for the best texture.
- Granulated Sugar (Cheesecake) – Sweetens the cheesecake filling beautifully.
- Sour Cream – Adds moisture and a delightful tang to the cheesecake filling.
• Optional Toppings
- Peanut Butter – Drizzle in or mix before baking for a Peanut Butter Swirl variation.
- Mint Extract – Add to create a Mint Chocolate variation; incorporating mint chocolate chips heightens that minty flavor.
Step‑by‑Step Instructions for Loaded Brownie Cheesecake Cups
Step 1: Preheat and Prepare
Preheat your oven to 325°F (165°C) for the perfect baking environment. While it heats up, line a muffin tin with cupcake liners to prevent sticking and ensure easy removal of the delicious Loaded Brownie Cheesecake Cups later on.
Step 2: Make Brownie Base
In a mixing bowl, whisk together melted butter and granulated sugar until the mixture is smooth and well combined. Next, incorporate room temperature eggs and vanilla extract, stirring until fully integrated. In a separate bowl, mix cocoa powder, flour, and salt, then gently fold these dry ingredients into the wet mixture, creating a thick brownie batter. Don’t forget to stir in mini chocolate chips, giving your brownie base those delightful chocolate bursts.
Step 3: Bake Brownies
Scoop the brownie batter into the prepared cupcake liners, filling them about one-third full. Place the muffin tin in the preheated oven and bake for 10-12 minutes. Keep an eye on them; they’re done when the edges are set, but the centers should still be slightly soft and fudgy.
Step 4: Prepare Cheesecake Filling
While the brownie cups are baking, take another bowl to beat the softened cream cheese until completely smooth and creamy. Gradually mix in granulated sugar, then add eggs individually, ensuring each is fully incorporated before adding the next. Stir in sour cream and vanilla extract, mixing until the cheesecake filling is luscious and free of lumps.
Step 5: Assemble and Bake
Once the brownie cups are out of the oven and slightly cooled, pour the smooth cheesecake mixture on top of each brownie layer, filling each cup to about three-quarters full. For best results, bake the Loaded Brownie Cheesecake Cups in a water bath for 20-25 minutes until the edges are firm, and the centers have a gentle jiggle, indicating a creamy texture.
Step 6: Cool Gradually
After baking, turn off the oven and crack open the oven door to let them cool gradually for 30 minutes. This step is crucial to minimize cracks in your creamy cheesecake layer. Once cooled, allow the cups to come to room temperature before transferring them to the refrigerator to chill for at least 4 hours or preferably overnight, allowing the flavors to meld beautifully.
Make Ahead Options
These Loaded Brownie Cheesecake Cups are perfect for busy home cooks looking to simplify their dessert planning! You can prepare the brownie base up to 24 hours in advance; simply bake it, allow it to cool, and cover it tightly with plastic wrap to maintain moisture. The cheesecake filling can also be made up to 3 days ahead—just store it in an airtight container in the refrigerator. When you’re ready to serve, pour the chilled cheesecake mixture over the brownie base and bake as instructed. By prepping in advance, you’ll ensure that these treats remain just as delicious while saving precious time on occasion days.
Expert Tips for Loaded Brownie Cheesecake Cups
-
Room Temperature Ingredients: Use room temperature ingredients, especially for the cheesecake, to avoid lumps and achieve a silky-smooth texture.
-
Prevent Cracking: Bake your cupcakes in a water bath to maintain moisture and prevent cracks in the delicate cheesecake layer.
-
Cooling Technique: Gradually cool the cups in the oven with the door ajar to help prevent sinking and cracking, ensuring a beautiful presentation.
-
Quality Matters: Always opt for high-quality cocoa powder to enhance the chocolate flavor in your Loaded Brownie Cheesecake Cups for a truly decadent treat.
-
Variations Galore: Experiment with different variations, like adding peanut butter or mint extract, to customize your Loaded Brownie Cheesecake Cups to your liking.
How to Store and Freeze Loaded Brownie Cheesecake Cups
-
Fridge: Store the Loaded Brownie Cheesecake Cups in an airtight container in the refrigerator for up to 5 days. Allow them to sit at room temperature for 15-20 minutes before serving for the best flavor.
-
Freezer: For longer storage, individually wrap each cheesecake cup in plastic wrap and place them in a freezer-safe bag. They can be frozen for up to 3 months.
-
Thawing: To enjoy your frozen treats, thaw the Loaded Brownie Cheesecake Cups in the refrigerator overnight. This way, they’ll maintain their delightful texture and taste.
-
Reheat: If you prefer them warm, reheat the cups in the microwave for 10-15 seconds, ensuring they don’t get too hot, as this could affect the creamy cheesecake layer.
Loaded Brownie Cheesecake Cups Variations
Let your imagination run wild as you explore delicious ways to customize these delightful dessert cups!
-
Peanut Butter Swirl: Drizzle peanut butter into the cheesecake layer before baking for a rich, nutty twist. Creamy and dreamy, this adds a delightful layer of flavor that fans of peanut butter won’t resist.
-
Mint Chocolate: Add mint extract to the cheesecake filling and toss in some mint chocolate chips for an invigorating minty experience. The refreshing taste pairs perfectly with the rich chocolate, creating a balanced and irresistible treat.
-
Dairy-Free Delight: Substitute cream cheese and sour cream with dairy-free alternatives like cashew cream and coconut yogurt; they’re equally rich and creamy, making this option perfect for those with dietary restrictions.
-
Gluten-Free Base: Use a 1:1 gluten-free flour blend in place of all-purpose flour to cater to gluten sensitivities without sacrificing flavor or texture. Enjoy all the indulgence without the worries!
-
Chocolate Hazelnut: Mix in some chocolate-hazelnut spread into the cheesecake layer for an extra chocolatey, nutty flavor that will leave everyone craving more. Adding chopped hazelnuts on top makes this variation even more decadent.
-
Espresso Infusion: Stir in a teaspoon of instant espresso powder into the brownie mix for a subtle hint of coffee flavor. This twist enhances the chocolate’s richness, appealing to coffee lovers everywhere.
-
Fruitful Topping: Top your cheesecake cups with fresh berries or a homemade fruit compote for a pop of color and freshness. The tartness complements the sweetness beautifully, brightening up your dessert.
-
Spicy Kick: For those who like it hot, add a pinch of cayenne pepper or a dash of chili powder to the brownie batter. The slight heat elevates the rich chocolate, creating a vibrant flavor experience that’s bound to impress.
Remember, the joy of cooking is all about personal expression! Explore different variations and discover your favorite take on these Loaded Brownie Cheesecake Cups to make them truly your own.
What to Serve with Loaded Brownie Cheesecake Cups?
These delightful dessert cups are a dream on their own, but when you pair them with the right accompaniments, they transform into an unforgettable experience.
-
Fresh Berries: A mix of vibrant strawberries, raspberries, or blueberries adds a refreshing burst and contrasts beautifully with the rich chocolate.
-
Whipped Cream: Light and airy, a dollop of freshly whipped cream on top elevates the dessert while providing a delightful creaminess that compliments the cheesecake layer.
-
Chocolate Drizzle: A drizzle of melted chocolate enhances the indulgence, making each bite even more decadent, perfect for chocolate lovers.
-
Ice Cream: A scoop of vanilla or mint chocolate chip ice cream adds a delightful cold factor, harmonizing with the warm brownie base for a delicious temperature contrast.
-
Coffee or Espresso: Pairing these cups with a rich cup of coffee or espresso will balance the sweetness beautifully, enhancing the chocolate flavor and rounding out the meal.
-
Caramel Sauce: A drizzle of warm caramel adds a sweet, buttery note that perfectly complements the chocolate and creamy cheesecake layers.
-
Nutty Toppings: Chopped nuts, such as walnuts or pecans, provide a crunchy texture addition, adding both flavor and a delightful bit of crunch to each bite.
-
Mint Leaves: For a touch of elegance and freshness, garnishing with mint leaves can brighten the dessert and enhance variations like the Mint Chocolate twist.
-
Sparkling Wine: A glass of sparkling wine or prosecco makes an elegant pairing, offering a refreshing contrast to the richness of the Loaded Brownie Cheesecake Cups.
Loaded Brownie Cheesecake Cups Recipe FAQs
How do I choose the right ripeness of ingredients, especially eggs and cream cheese?
Absolutely! For eggs, choose large eggs that are at room temperature for better emulsification, leading to a smoother cheesecake. When selecting cream cheese, opt for full-fat versions that are fresh and free of any discoloration. Softened cream cheese blends effortlessly, ensuring a creamy texture in your filling!
What is the best way to store leftovers?
To keep your Loaded Brownie Cheesecake Cups fresh, store them in an airtight container in the refrigerator for up to 5 days. Let them sit at room temperature for about 15-20 minutes before serving to enhance their flavor and creaminess. This way, you can enjoy each delicious bite just as much as when they were freshly made!
Can I freeze these cheesecake cups? If so, how?
Yes, you can freeze your Loaded Brownie Cheesecake Cups! Wrap each cup individually in plastic wrap, ensuring no air pockets remain, then place them in a freezer-safe bag or container. They can last up to 3 months in the freezer. When you’re ready to indulge, simply thaw them in the refrigerator overnight to maintain their delightful consistency.
What should I do if my cheesecake layer cracks during baking?
Very common! If you notice cracks in the cheesecake layer, don’t worry too much. To help prevent cracks next time, make sure to bake them in a water bath, which adds moisture to the oven environment. Also, gradually cool the cups with the oven door slightly ajar after baking to prevent sudden temperature changes that cause cracking. And remember, they’re still delicious even with a few imperfections!
Are these Loaded Brownie Cheesecake Cups suitable for special diets?
The more the merrier! You can make these cups gluten-free by substituting all-purpose flour with a 1:1 gluten-free blend. For a dairy-free option, substitute cream cheese with a dairy-free cream cheese alternative and replace sour cream with a non-dairy yogurt to achieve a similar texture and taste. These modifications ensure that everyone can indulge in this treat!
Loaded Brownie Cheesecake Cups: Decadent Chocolate Bliss
Ingredients
Equipment
Method
- Preheat your oven to 325°F (165°C) and line a muffin tin with cupcake liners.
- In a mixing bowl, whisk together melted butter and granulated sugar until smooth. Mix in eggs and vanilla.
- In a separate bowl, combine cocoa powder, flour, and salt, then fold into the wet mixture. Stir in mini chocolate chips.
- Scoop the batter into prepared liners, filling one-third full. Bake for 10-12 minutes.
- Beat cream cheese until smooth, add sugar, then eggs one at a time, followed by sour cream and vanilla.
- Pour cheesecake mixture over brownie layer in each cup, filling three-quarters full. Bake in a water bath for 20-25 minutes.
- Turn off the oven and crack the door for 30 minutes to cool, then chill in the fridge for at least 4 hours.
Leave a Reply